WPF Commands – A Pattern that Works

Using commands in WPF can be frustrating. Having so many different ways to do commanding in WPF leads to some confusion. There are multiple ways to wire up commands that are equally correct, though some patterns are cleaner than others.

Below is a pattern that works.

Create static property to expose command

Making the command a property rather than a variable makes the syntax in XAML a bit cleaner.  Using RoutedUICommand allows setting the text for the command. This is useful if you want to use the command in multiple places.

Here’s code for creating the command, e.g. in a MainWindow class:

private static RoutedUICommand _pressMeCommand = new RoutedUICommand("Press Me", "PressMe", typeof(MainWindow));
public static RoutedUICommand PressMeCommand
{
    get { return _pressMeCommand; }
}

Add CanExecute and Executed handlers

Add code in code-behind (or ViewModel) for handlers. Below, we have private handlers in MainWindow. In this example, we have a boolean indicating whether the command can be executed. You could also put the logic directly in CanExecute, if it’s not used elsewhere.

private void PressMe_CanExecute(object sender, CanExecuteRoutedEventArgs e)
{
    e.CanExecute = CowboyCanTalk;
}

private void PressMe_Executed(object sender, ExecutedRoutedEventArgs e)
{
    MessageBox.Show("Howdy howdy I'm a cowboy");
}

Set up command binding

You can do this from code or XAML.  Doing it in XAML is perhaps a bit cleaner. Below is an example of binding the above command to its handlers from XAML (for MainWindow). Note that we can just use command name instead of {x:Static syntax because we made the command a property.

<Window.CommandBindings>
    <CommandBinding Command="local:MainWindow.PressMeCommand"
                    CanExecute="PressMe_CanExecute"
                    Executed="PressMe_Executed"/>
</Window.CommandBindings>


Wire up a button

Below, we wire a button up to the command.  You could just set Content to text directly. This would be fine to do and is simpler than what we’re doing below. But putting the text into the RoutedUICommand is helpful if you use the command in more than one place (since you specify text in just one place—in the command). And menu items automatically pick up the command text. (NOTE: If you used this pattern for Content regularly, you could just put it in a style to hide the complexity).

<Button Command="local:MainWindow.PressMeCommand"
        Content="{Binding RelativeSource={RelativeSource Self}, Path=Command.Text}" />

Wire up a menu item

Below, we wire up a menu item in a context menu to the same command. Note that here we do have to use the x:Static syntax. But also note that we don’t need to specify text for the menu item—it comes from the RoutedUICommand.

<Window.ContextMenu>
    <ContextMenu>
        <MenuItem Command="{x:Static local:MainWindow.PressMeCommand}" />
    </ContextMenu>
</Window.ContextMenu>

Bottom line

  • We used RoutedUICommand so that we could attach text to the command and avoid specifying text for both button and menu item
  • Binding in XAML is a (tiny) bit less code than doing it in code-behind

Other thoughts

  • You could also use a DelegateCommand pattern, passing in lambdas for both CanExecute and Executed. Use of a DelegateCommand is common in MVVM architectures.


TechEd NA 2014 – Windows Desktop Development – Panel Discussion

TechEd North America 2014, Houston
Windows Desktop Development – A Panel Discussion – Dmitry Lyalin, Tim Heuer, Habib Heydarian, Chipalo Street, Eric Battalio, Jay Schmelzer

Day 3, 14 May 2014, 1:30PM-2:45PM (DEV-B327)

Disclaimer: This post contains my own thoughts and notes based on attending TechEd North America 2014 presentations. Some content maps directly to what was originally presented. Other content is paraphrased or represents my own thoughts and opinions and should not be construed as reflecting the opinion of either Microsoft, the presenters or the speakers.

Executive Summary—Sean’s takeaways

  • Universal App platform really pervades everything that dev teams are doing
  • .NET Native – for faster Windows Store apps
  • Worth looking at PRISM—good way to build apps
  • If using C++, make sure you’re using modern C++, i.e. C++11

Full video

Dmitry Lyalin, Product Manager, Visual Studio, Microsoft

Panel members are all Engineering team members from the Visual Studio team.

Agenda

  • What’s new for WPF devs
  • Panel discussion

On the panel:

  • Tim Heuer – Program Manager, XAML UI
  • Habib Heydarian – Principal Group Manager, .NET Team
  • Chipalo Street – Program Manager, XAML
  • Eric Battalio – Senior Program Manager, C++
  • Jay Schmelzer – Partner Director, .NET Team

VS 2013 XAML improvements

  • Intellisense for data binding & resources
  • Go to definition (F12)
  • Nesting comments in markup
  • Renaming start tag renames end tag
  • New XAML code snippets

PRISM v5 (WPF & .NET 4.5)

  • PCL version of Prism library
  • Separate features into separate assemblies
  • Address high priority items

Debugging and Diagnostics

  • Memory analysis
    • New managed memory analyzer
  • Debugging improvements (4.5.1)
    • 64-bit edit and continue
    • Improved async debugging

Q: Deploy 4.5 app in 4.0 environment?

  • 4.5 is in-place update, so you can upgrade
  • ASP.NET vNext – new model
  • To get new functionality, you do need to install .NET 4.5

.NET Native vs. Traditional

  • Framework displayed as one single unit
  • .NET Native not yet available for desktop apps

Q: Problem when View tries to load other DLLs and they get called when I go into design surface

  • See Hari, try to repro this

On the radar – new deployment models for desktop apps

  • Maybe sort of Windows Store model for company apps within the enterprise

Q: Do you recommend always working in x86 mode in designer?

  • Yes

Q: If you put custom controls in shared UI library, seems like they never show up in the designer.

  • Take this offline

Q: Can you auto format when you change tag?

  • It’s either everything on one line, or one line per property

Q: XAML verbosity – anything planned to make XAML more concise? E.g. Data bindings, Setters, Converters, etc. Improvements to XAML syntax coming?

  • Point to tools, Intellisense / Auto Completion, code snippets
  • Language evolving – has evolved just a bit, simplifying
  • Tough to change XAML itself, because it’s a public language spec
  • Thought about inline scripting, but thinking about ways to do less markup and have XAML compiler generate stuff
  • “More of a compiled approach” in tools

Q: 4.53 coming? 5.0? Compatibility?

  • For 4.5.1, did around 300 compatibility fixes
  • 4.5.2, 120+ compatibility fixes
  • So 4.5.2 more compatible than 4.5 was
  • Cadence is going to continue to be quick—new framework every few months
  • Can no longer just release stuff every 3 years

Q: WPF dev doing LOB apps that will never be touch-based. Screens too busy. Any chance of writing desktop apps, but using Windows RT

  • When Win 8 came out, it was really focused on mobile. But now more focused on desktop
  • Now, with Universal Apps, spacing that is nice for both desktop usage but also okay for touch
  • E.g. For Outlook, Microsoft will try to have one single GUI that works on both Win RT and desktop

Q: WPF pain point – implicit styles for windows in user controls. Couldn’t define implicit style that applies to all user controls.

  • No plans, but follow-up with us

Q: For cross-platform, we still have to do View on specific platforms. But is there any way to use XAML solution for other platforms?

  • Third party doing this
  • We’re not thinking about this right now
  • If you need a cross-platform UI language, HTML is the way to go
  • Shared projects in Visual Studio
  • UI abstraction layers are tough. Not sure that it’s something that would work for users
  • Goal is to provide best native for Windows and also best web for cross-platform UI

Q: In 2012, we used Blend. Now, in VS 2013, about 90% of the stuff that was in Blend is now in Visual Studio. What’s the future of Blend and Visual Studio?

  • Purely design-oriented things like states will stay in Blend

Q: Can I do Roslyn plug-ins?

  • Yes, can do little plug-ins. E.g. Diagnostics, distribute in your team, flag violations of coding standards
  • Yes, you can do that on top of Microsoft’s copy of Roslyn

Q: What are the C++ guys working on?

  • See the VC blog
  • We hear a lot about performance and MFC
  • Talk at BUILD about C++ performance
  • MFC – no definite plans
  • MSDN guys are focused on scenarios, rather than on purely API documentation

Q: Future planning for Windows, e.g. Minority Report or 3D UI experience

  • Contact lenses? Tongue-in-cheek comment—makes Oculus Rift look like child’s play
  • Kinect for Windows, continued work
  • Nothing for augmented reality at the moment

Q: What does .NET Native mean for C++?

  • “Productivity of C# and performance of C++”
  • Recommend: continue developing in whatever paradigm you’re comfortable with
  • .NET Native still has garbage collector, so C++ might be preferable to some who want to do their only memory management
  • .NET Native v1 targeted just at Windows Store apps
  • In modern C++, you’re not typically doing new/delete explicitly
  • Should be using C++11
  • “It’s not like it used to be”

Q: Why is .NET Native limited to Windows Store apps and not desktop?

  • Win Phone, “compiler in the cloud”, you upload IL and it compiles down
  • Started with phone, no technological hurdles to do it on the desktop

Q: What is the next thing for which support will drop off (like XP)?

  • The .NET Framework versions support is matched to the corresponding OS version
  • Lifecycle Policy for out of band releases
    • E.g. Framework 4.0, we do something like 2-4 yrs
  • So when next version of Windows is deprecated, associated .NET Framework for that OS will also be deprecated/expired

Q: Moving from 2.0 to 4.0, customers still on XP. Can we go directly to 4.5 and run on XP?

  • As of 4.5, we no longer support XP

Q: Universal Apps – WPF ?

  • “Head” projects in solution – Windows Store, Phone 8, WPF
  • Don’t expect everything to work with shared projects
  • But can do partial classes

Q: Apps don’t scale well on different resolution devices (pre-WPF). Some controls scale, some don’t. Will you revise scalability for older apps? Win Forms. Or Wizard to convert from Win Forms to WPF

  • There are people thinking about multi-resolutions. Starting with immersive (phones), then WPF now.
  • Not sure how much they’ve thought about Win32 / Win Forms stuff, though
  • Some new lower-level APIs in Windows 8 to help app get more info about DPI stuff. Could call directly from your app
  • .NET 4.5.2, some fixes in Win Forms stack to make control a tiny bit more DPI aware
  • Jay: No silver bullet. There’s stuff that just won’t automatically scale
  • Maybe something in the future, but will have to go back and touch your apps to fix things

Q: OpenGL support on Win Phone 8.1?

  • Unknown

Q: When is next update to DirectX that will get pulled into WPF?

  • Newer features on older platforms..
  • DirectX – struggle with value of just updating to DX11. What does it give you?
  • Maybe just D3Dimage improvement?
  • Not sure what ROI is, just going to DX11

Q: Recommendation for native application that does graphics?

  • Eric: No answer.
  • Universal App, includes support for Native C++ / XAML
  • Office internally, tablet apps are using Native XAML
    • So we’ll have to give them something for native desktop apps

Creating a ListBox that Shows All Predefined System Colors

The System.Windows.SystemColors class contains a series of static properties that expose the current predefined system colors.  The properties come in triplets.  For each system color Xxx, there are XxxBrush, XxxBrushKey and XxxColor properties.

We can easily create a little WPF application to display the current system colors by building a collection of brushes and then binding the collection to a ListBox.

Here’s the final result:

Below is the code that I used to create the list.

I start with a little utility class that wraps up a named system color and its Brush:

    public class ColorInfo
    {
        public string Name { get; set; }
        public Brush Brush { get; set; }

        public ColorInfo(string name, Brush brush)
        {
            Name = name;
            Brush = brush;
        }
    }

Next, I add a collection to my main Window class, which will store a list of ColorInfo objects:

    private ObservableCollection<ColorInfo> allSystemColors;
    public ObservableCollection<ColorInfo> AllSystemColors
    {
        get { return allSystemColors; }
    }

In the window’s constructor, I populate this list, using reflection.  Notice that I iterate through all of the properties in the SystemColors class and grab only those whose names end in “Brush”.

        allSystemColors = new ObservableCollection<ColorInfo>();

        Type scType = typeof(SystemColors);
        foreach (PropertyInfo pinfo in scType.GetProperties())
        {
            if (pinfo.Name.EndsWith("Brush"))
                allSystemColors.Add(new ColorInfo(pinfo.Name.Remove(pinfo.Name.Length - 5),
                                                (Brush)pinfo.GetValue(null, null)));
        }

All that remains is to bind this collection to a ListBox.  We do this in the XAML:

    <ListBox ItemsSource="{Binding ElementName=mainWindow, Path=AllSystemColors}"
		ScrollViewer.HorizontalScrollBarVisibility="Disabled"
		ScrollViewer.VerticalScrollBarVisibility="Auto" >
    	<ListBox.ItemsPanel>
    		<ItemsPanelTemplate>
    			<WrapPanel />
			</ItemsPanelTemplate>
		</ListBox.ItemsPanel>
		<ListBox.ItemTemplate>
	        <DataTemplate>
	        	<StackPanel Orientation="Vertical">
	                <Rectangle Fill="{Binding Path=Brush}" Stroke="Black" Margin="5" StrokeThickness="1" Height="74" Width="120"/>
	                <TextBlock Text="{Binding Path=Name}" HorizontalAlignment="Center"/>
				</StackPanel>
	        </DataTemplate>
	    </ListBox.ItemTemplate>
    </ListBox>

Voila!

Creating a ListBox that Shows All Predefined WPF Colors

In WPF, you can use the Colors class to access a series of predefined colors, defined as static properties of the Colors class.  You reference each color just using the name of the color.

For reference, here’s a little application that shows all colors in a ListBox.  (Credit to casperOne, in a stackoverflow post that shows how to create an object that encapsulates the list of properties in the Colors class).

Here’s the final result.  (Click on the image to see it full-sized).

The XAML for generating this list is pretty straightforward:

<Window
	xmlns="http://schemas.microsoft.com/winfx/2006/xaml/presentation"
	xmlns:x="http://schemas.microsoft.com/winfx/2006/xaml"
	xmlns:d="http://schemas.microsoft.com/expression/blend/2008" xmlns:mc="http://schemas.openxmlformats.org/markup-compatibility/2006" mc:Ignorable="d"
	xmlns:local="clr-namespace:WpfApplication1"
    xmlns:sys="clr-namespace:System;assembly=mscorlib"
    x:Class="WpfApplication1.MainWindow"
	x:Name="Window"
	Title="All Colors"
	Width="640" Height="480" >

    <Window.Resources>
        <ObjectDataProvider MethodName="GetType"
        ObjectType="{x:Type sys:Type}" x:Key="colorsTypeOdp">
            <ObjectDataProvider.MethodParameters>
                <sys:String>System.Windows.Media.Colors, PresentationCore,
                Version=3.0.0.0, Culture=neutral,
                PublicKeyToken=31bf3856ad364e35</sys:String>
            </ObjectDataProvider.MethodParameters>
        </ObjectDataProvider>

        <ObjectDataProvider ObjectInstance="{StaticResource colorsTypeOdp}"
        MethodName="GetProperties" x:Key="colorPropertiesOdp">
        </ObjectDataProvider>
    </Window.Resources>

    <ListBox ItemsSource="{Binding Source={StaticResource colorPropertiesOdp}}"
		ScrollViewer.HorizontalScrollBarVisibility="Disabled"
		ScrollViewer.VerticalScrollBarVisibility="Auto" >
    	<ListBox.ItemsPanel>
    		<ItemsPanelTemplate>
    			<WrapPanel />
			</ItemsPanelTemplate>
		</ListBox.ItemsPanel>
		<ListBox.ItemTemplate>
        <DataTemplate>
        	<StackPanel Orientation="Vertical">
                <Rectangle Fill="{Binding Path=Name}" Stroke="Black" Margin="4" StrokeThickness="1" Height="50" Width="81"/>
                <Label Content="{Binding Path=Name}" />
			</StackPanel>
        </DataTemplate>
    </ListBox.ItemTemplate>
    </ListBox>
</Window>

Setting Up a Bare Minimum WPF Development Environment

Microsoft now offers Visual Studio 2010 in an Express edition–which is free.  You’re limited to a single language, but you can develop WPF applications using Express.

In this post, I walk through the exact steps to install and use Visual Studio 2010 Express (C# edition).  The install was done a clean Windows 7 machine.

To start with, go to the Microsoft Express download site.  Click on the link for the development language of your choice (e.g. C#, VB, C++) and then select a language (e.g. English).  The install package will start downloading.

This will download file named vcs_web.exe.  Double-click on the file to start the install process.

Click Yes on the UAC dialog.

Installation files will be extracted:

You’ll get to the first install dialog.  Be a good citizen and agree to send information about your “setup experience” back to Microsoft.  After all, they’re giving you a free product.

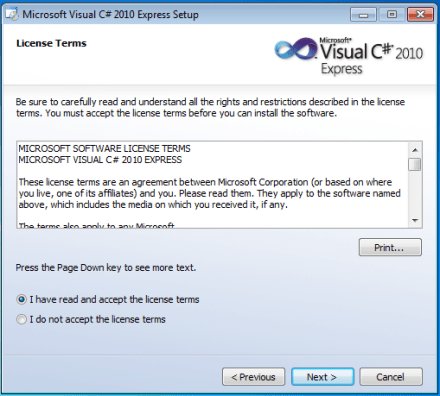
Carefully read every word in the license agreement and then agree to it.  (Yes, of course I’m being tongue-in-cheek when I say to read every word).

You can optionally decide to install Silverlight and/or SQL Server Express.  For this example, I’ll install Silverlight only.

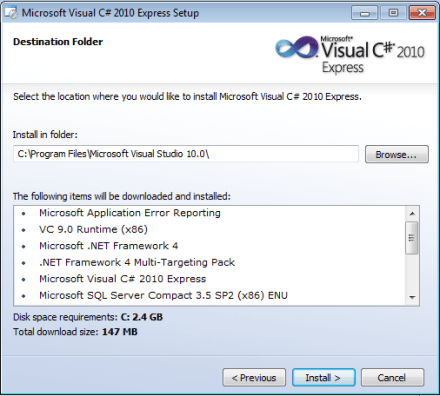
Decide what directory to install into.  The default is fine.

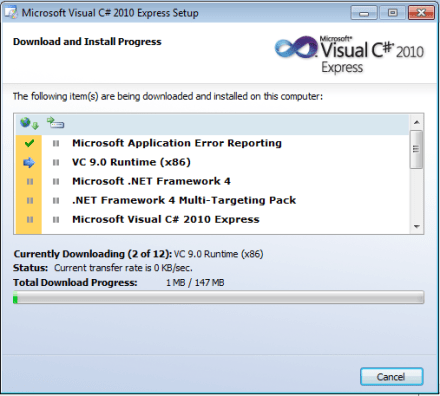
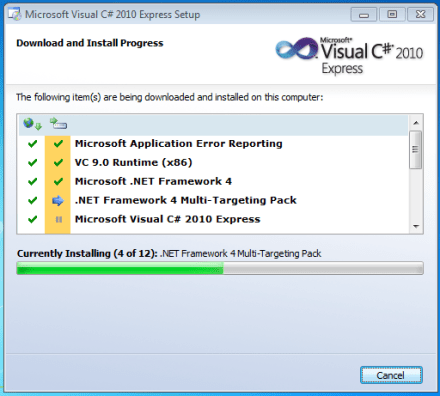
Things start downloading and installing.  Sit back and wait–this will take a while.

You may need to restart in the middle of the installation.

After the reboot, the install continues.

Your patience will eventually be rewarded, as the installation completes.

Oh wait–one more restart, just for good measure.

Now you’ll see Visual Studio C# 2010 Express in your Start Menu.

When you start Visual Studio for the first time, you’ll see the Start Page.  You can click on the New Project link to create your first project.  The New Project dialog lists the various types of projects that you can create:

  • Windows Forms Application
  • WPF Application
  • Console Application
  • Class Library
  • WPF Browser Application
  • Empty Project

(Notice that we can’t create Silverlight projects–the Silverlight option that we chose during the install likely just installed the Silverlight runtime, rather than the Silverlight tools for Visual Studio).

At this point, you’re all set.  You have everything that you need, to create Windows client applications–either Windows Forms or WPF.  If you’re building something new, you’ll likely want to start with WPF.

An Application to Let You View WPF Logical Trees

In WPF, a logical tree is just the hierarchy of elements that make up your user interface.  If your user interface is defined in XAML, the logical tree is the set of elements from the XAML, organized into a tree based on their parent/child relationships.

Logical Tree Basics

The logical tree can also be thought of as a model that describes the relationships between objects at runtime.  Knowing the logical tree can be helpful in understanding:

  • Resource lookup
  • Property inheritance
  • Event routing

As an example, the logical tree for the following XAML:

 <Window x:Class="WpfApplication4.MainWindow"
      xmlns="http://schemas.microsoft.com/winfx/2006/xaml/presentation"
     xmlns:x="http://schemas.microsoft.com/winfx/2006/xaml"
     Title="A window.." Height="350" Width="525">
     <StackPanel>
         <Button Content="Click Me" Height="23" HorizontalAlignment="Left" Width="75" Click="button1_Click" />
         <TextBox />
         <ListBox>
             <ListBoxItem Content="Barley"/>
             <ListBoxItem Content="Oats"/>
         </ListBox>
     </StackPanel>
 </Window>

can be represented by the following logical tree:

You can use the LogicalTreeHelper.GetChildren method to traverse a logical tree and enumerate all of the objects in the tree.

Every element in a logical tree is a DependencyObject, so you pass a top-level object that derives from DependencyObject into the GetChildren method.  The method returns a collection of children of that object.

 // Enumerate each immediate child of main window.  (Does NOT descend down tree)
 foreach (Object obj in LogicalTreeHelper.GetChildren(mainWindow as DependencyObject))
     Debug.WriteLine(obj.ToString());

An Application for Viewing Logical Trees

I wrote a little application that opens a specified .xaml file and then displays the logical tree from that .xaml file in a TreeView.

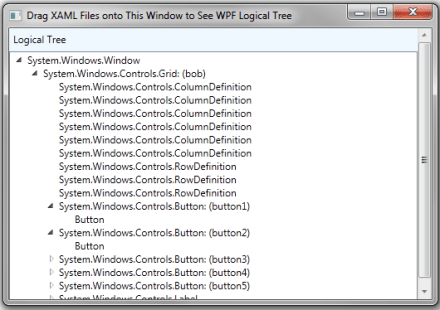
Here’s what the end result looks like:

To start, you just drag a .xaml file onto the surface of the application’s main window.  It then goes through the following steps:

  • Uses XamlReader.Load method to load the .xaml file into memory, creating objects to represent each element found in the .xaml file
  • Uses LogicalTreeHelper.GetChildren method to traverse the logical tree
  • For each node in the object tree, manually adds type name and (if it exists) object name to a TreeView

Current limitations:

  • Throws an exception if you try to load .xaml that includes an x:Class attribute  (you need to remove the attribute before loading the file)
  • Can’t load .xaml fragments if they don’t include the required XAML vocabulary namespaces
  • Have tested with Window as root element, but no guarantee that it works for other root elements

Where to Find WPF Logical Tree Application

You can find full source code on Codeplex, at wpflogicaltree.codeplex.com.

Under the Covers

The GUI for the application is simple–basically just a Label and a TreeView:

 <Window x:Class="DisplayWpfTrees.MainWindow"
     xmlns="http://schemas.microsoft.com/winfx/2006/xaml/presentation"
     xmlns:x="http://schemas.microsoft.com/winfx/2006/xaml"
     Title="Drag XAML Files onto This Window to See WPF Logical Tree" Height="350" Width="525" AllowDrop="True"
     Drop="Window_Drop" >
     <ScrollViewer VerticalScrollBarVisibility="Auto">
         <StackPanel Name="spMain" >
             <Label Content="Logical Tree" Height="28" Background="AliceBlue"/>
             <TreeView Name="tvLogical" />
         </StackPanel>
     </ScrollViewer>
 </Window>

You use drag and drop to tell the application to load a .xaml file.  The DragEnter event allows limiting the application to files being dropped.  The Drop event picks up the name of the file being dropped and then calls a helper class to do the loading and initialization of the TreeView.


using System;
using System.Collections.Generic;
using System.Diagnostics;
using System.IO;
using System.Linq;
using System.Reflection;
using System.Text;
using System.Windows;
using System.Windows.Controls;
using System.Windows.Data;
using System.Windows.Documents;
using System.Windows.Input;
using System.Windows.Markup;
using System.Windows.Media;
using System.Windows.Media.Imaging;
using System.Windows.Navigation;
using System.Windows.Shapes;
using System.Xaml;

namespace DisplayWpfTrees
{
    /// <summary>
    /// Interaction logic for MainWindow.xaml
    /// </summary>
    public partial class MainWindow : Window
    {
        public MainWindow()
        {
            InitializeComponent();
        }

        /// <summary>
        /// DragEnter allows prohibiting disallowed formats on drop
        /// </summary>
        /// <param name="sender"></param>
        /// <param name="e"></param>
        private void Window_DragEnter(object sender, DragEventArgs e)
        {
            if (!e.Data.GetDataPresent(DataFormats.FileDrop))
            {
                e.Effects = DragDropEffects.None;
                e.Handled = true;
            }
        }

        /// <summary>
        /// DragEnter allows prohibiting disallowed formats on drop
        /// </summary>
        /// <param name="sender"></param>
        /// <param name="e"></param>
        private void Window_DragOver(object sender, DragEventArgs e)
        {
            if (!e.Data.GetDataPresent(DataFormats.FileDrop))
            {
                e.Effects = DragDropEffects.None;
                e.Handled = true;
            }
        }

        /// <summary>
        /// When file is dropped on window, dump its logical tree to our TreeView
        /// </summary>
        /// <param name="sender"></param>
        /// <param name="e"></param>
        private void Window_Drop(object sender, DragEventArgs e)
        {
            string[] files = (string[])e.Data.GetData(DataFormats.FileDrop);

            string filename = files[0];     // Only deal with first one
            FileInfo fi = new FileInfo(filename);

            if (fi.Extension == ".xaml")
            {
                tvLogical.Items.Clear();

               MyLogicalTreeHelper.LoadAndAddXAMLFile(tvLogical, filename);
            }

            e.Handled = true;
        }

    }
}

Finally, the MyLogicalTreeHelper class includes the method LoadAndAddXAMLFile, which does the work of loading the file and building up the TreeView elements.


using System;
using System.Collections.Generic;
using System.IO;
using System.Linq;
using System.Reflection;
using System.Text;
using System.Windows;
using System.Windows.Controls;

namespace DisplayWpfTrees
{
    public class MyLogicalTreeHelper
    {
        /// <summary>
        /// Load loose XAML, creating object graph, then dump that graph's logical
        ///   tree to a TreeView.
        /// </summary>
        /// <param name="tv"></param>
        /// <param name="filename"></param>
        public static void LoadAndAddXAMLFile(TreeView tv, string filename)
        {
            try
            {
                // Load loose XAML file
                DependencyObject root = (DependencyObject)LoadXAMLObjectGraphFromFile(filename);

                // Descend through logical tree, adding items to TreeView
                DumpLogicalTreeToTreeView(root, tv.Items);

                // If root object is Window, we need to call Close method to avoid process from
                //   running indefinitely.  ??
                Window win = root as Window;
                if (win != null)
                    win.Close();
            }
            catch (Exception xx)
            {
                MessageBox.Show(string.Format("Error while trying to load .xaml: {0}", xx.Message));
            }
        }

        /// <summary>
        /// Given filename, use XamlReader to construct XAML objects by reading the file
        /// </summary>
        /// <param name="xmlString"></param>
        /// <returns></returns>
        private static object LoadXAMLObjectGraphFromFile(string filename)
        {
            using (FileStream fs = new FileStream(filename, FileMode.Open, FileAccess.Read))
            {
                return System.Windows.Markup.XamlReader.Load(fs);
            }
        }

        /// <summary>
        /// Add children of specified parent to TreeView, under specified node
        /// </summary>
        /// <param name="parent"></param>
        /// <param name="lvi"></param>
        private static void DumpLogicalTreeToTreeView(object parent, ItemCollection tvItems)
        {
            TreeViewItem tvi = new TreeViewItem();
            tvi.Header = XamlElementAsString(parent);
            tvItems.Add(tvi);

            if (!(parent is DependencyObject))
                return;

            foreach (object child in LogicalTreeHelper.GetChildren(parent as DependencyObject))
            {
                DumpLogicalTreeToTreeView(child, tvi.Items);
            }
        }

        /// <summary>
        /// Render a XAML element as a string that contains full type name and optional
        ///   element Name.
        /// </summary>
        /// <param name="theElement"></param>
        /// <returns></returns>
        private static string XamlElementAsString(object theElement)
        {
            string asString;

            // Simple elements (e.g. text content), just convert to string
            if (!(theElement is DependencyObject))
                asString = theElement.ToString();

            else
            {
                // Get full type name
                Type objType = theElement.GetType();
                asString = objType.ToString();

                // Optionally, if the element has a name, append it
                PropertyInfo pi = objType.GetProperty("Name");
                if (pi != null)
                {
                    string name = (string)pi.GetValue(theElement, null);
                    if ((name != null) && (name != ""))
                        asString = string.Format("{0}: ({1})", asString, name);
                }
            }

            return asString;
        }
    }
}

Next Steps

This is all pretty clunky, but it works in a limited fashion.  Obvious next steps include:

  • Data bind the TreeView using HierarchicalDataTemplate, rather than building it up manually
  • Helper class should just build up an object model without having any knowledge of GUI elements (like the TreeView)
  • Automatically strip out x:Class attributes so that files can contain them
  • Better understanding of why process runs indefinitely if you don’t invoke Window.Close
  • Add support for also displaying the visual tree

MDC 2010 Takeaways

I attended the Minnesota Developers Conference (MDC 2010) yesterday in Bloomington, MN.  A nice dose of conference-motivation–some good speakers talking about great technologies.  In the FWIW category, here are my lists of takeaways for the talks that I attended.

1.       Keynote – Rocky Lhotka (Magenic)

General overview of development landscape today, especially focused on cloud computing and the use of Silverlight.  Takeaways:

  • We’re finally getting to a point where we can keep stuff in “the cloud”, access anywhere, from any device
  • Desire to access application data in the cloud, from any device, applies not just to consumer-focused stuff, but also to business applications
  • Smart client apps, as opposed to just web-based, are important/desired – intuitive GUI is how you differentiate your product and what users now expect
  • HTML5 is on the way, will enable smart client for web apps
  • Silverlight here today, enables smart clients on most devices (not iPhone/IOS)
  • Silverlight/WPF is ideal solution.  You write .NET code, reuse most GUI elements on both thick clients (WPF) running on Windows, and thin clients (Silverlight) running web-based or on mobile devices
  • I didn’t realize that I have in common with Rocky: working on teletypes, DEC VAX development, Amiga development. :O)
  • http://www.lhotka.net/weblog/ , @RockyLhotka (Twitter)

2.       WPF with MVVM From the Trenches – Brent Edwards (Magenic)

Practical tips for building WPF applications based on MVVM architecture.  What is the most important stuff to know?  Excellent talk.  Takeaways:

  • MVVM excellent pattern for separating UI from behavior.  Benefits: easier testing, clean architecture, reducing dependencies
  • MVVM is perfect fit for WPF apps, very often used for WPF/Silverlight
  • MVVM perfect fit for WPF/Silverlight, makes heavy use of data binding
  • Details of how to do data binding in MVVM, for both data and even for command launching
  • How to use: data binding, DataContext, Commanding, data templates, data triggers, value converters.  (Most often used aspects of WPF)
  • Showed use of message bus, centralized routing of messages in typical MVVM application.  Reduces coupling between modules.  (aka Event Aggregator).   Used Prism version.
  • Slide deck – http://www.slideshare.net/brentledwards/wpf-with-mvvm-from-the-trenches
  • http://blog.edwardsdigital.com/, @brentledwards (Twitter)

3.       Developer’s Guide to Expression Blend – Jon von Gillern (Nitriq)

Demoing use of Expression Blend for authoring UI of WPF/Silverlight apps.  Also demoed Nitriq/Atomiq tools.  Takeaways:

  • Blend not just for designers; developers should make it primary tool for editing GUI—more powerful than VStudio
  • Lots of tricks/tips/shortcuts – he handed out nice cheatsheet – http://blog.nitriq.com/content/binary/DevelopersGuidetoBlend.pdf
  • Very easy to add simple effects (e.g. UI animations) to app elements to improve look/feel, just drag/drop
  • Nitriq – tool for doing basic code metrics, summaries, visualize code, queries that look for style stuff.  (Free for single assembly, $40 for full )
  • Atomiq – find/eliminate duplicate code, $30
  • http://blog.nitriq.com/, @vongillern (Twitter)

4.       Introduction to iPhone Development – Damon Allison (Recursive Awesome)

Basic intro to creating iPhone app, showing the tools/language/etc.  From a .NET developer’s perspective.  Takeaways:

  • You have to do the dev work on a Mac—no tools for doing the work on Windows
  • The tools are archaic, hard to work with, much lower level than .NET.  (E.g. no memory management)
  • In many cases, consider creating web-baesd mobile app, rather than native iPhone.  But then you wrestle with CSS/browser issues
  • Worth considering creation of native iPhone app for the best user experience
  • Lots of crestfallen-looking .NET developers in the audience
  • http://www.recursiveawesome.com/blog/ , damonallison (Twitter)

5.       A Lap Around Prism 4.0 – Todd Van Nurden (Microsoft)

Showing Prism—a free architectural framework written by Microsoft, came out Patterns and Practices group.  Good for creating extensible apps, with plug-in model.  Takeaways:

  • Leverages MEF (Microsoft Extensibility Framework)
  • Good for apps where you have the idea of a lot of “tools” that plug into main application architecture.  Or for applications made up of various building blocks.
  • You write application modules that are decoupled from main app framework, loaded on demand.
  • Prism on Codeplex – http://compositewpf.codeplex.com/
  • http://www.spoke.com/info/p5rAVze/ToddVanNurden

Hello Silverlight World, part 2 – The Application Object

In my last Silverlight post, Hello Silverlight part 1 – Generating the Project, I started creating a Silverlight-based Hello World application.  I described the various pieces that get created by the Project Wizard in Visual Studio 2008.  I also started comparing the Silverlight application to a wizard-generated WPF application.

Let me continue looking at the individual pieces that make up a bare-bones Silverlight application.  Maybe the convention should be to call it a “Silverlight control”, since that seems a bit more accurate.  For now, I’ll stick with Visual Studio’s terminology and call it a “Silverlight application”.

App.xaml

Like our WPF application, the main entry point of the Silverlight application is described by the App.xaml / App.xaml.cs files.  In both WPF and Silverlight, these files define a subclass of System.Windows.Application, which serves as the main object loaded at runtime.

In both WPF and Silverlight, we can look at the code in App.xaml.cs and App.g.cs (generated at build time) to get a sense of how the application gets loaded and run.  What we see is very different behavior, despite the fact that both App classes appear to derive from System.Windows.Application.

In the WPF application, here’s what happens:

  • There is an entry point named Main()
  • Main()
    • Creates an instance of the App class
    • Calls the InitializeComponent method of the App object
    • Calls the Run method of the App object
  • App.InitializeComponent
    • Sets App.StartupUri property to point to a Uri object pointing to Window1.xaml, our main window

In the Silverlight application, something very different is going on at startup:

  • There is no Main() method
  • The App constructor
    • Wires up the Application_Startup event handler to the App.Startup property
    • Wires up the Application_Exit event handler to the App.Exit property
    • Wires up the Application_UnhandledException event handler to the UnhandledException property
    • Invokes InitializeComponent
  • Application_Startup
    • Instantiates a new Page object (the class for our main page)
    • Sets App.RootVisual to point to this page object
  • InitializeComponent
    • Calls Application.LoadComponent, passing it a new Uri object pointing to App.xaml

Why is the startup behavior so radically different, between WPF and Silverlight, given that the main application appears to be inherited from System.Windows.Application in both cases?

The answer is that, while the class name and namespace are identical, the Application object in Silverlight is a very different animal than the one that is part of WPF.  Remember that the WPF application is running against an entirely different .NET Framework than the Silverlight application.  WPF is referencing/using the full .NET Framework 3.5 (with pieces from 2.0, 3.0 and 3.5), while the Silverlight application is referencing/using the Silverlight Framework, which is an entirely different set of libraries.  While much of the Silverlight framework is a subset of the WPF framework, the Application object is entirely different.

  • In WPF, the System.Windows.Application class lives in PresentationFramework.dll
  • In Silverlight, System.Windows.Application lives in System.Windows.dll

PresentationFramework.dll is part of the .NET Framework 3.0 and exists on a  client system when they install the full .NET Framework (3.0 or 3.5).  System.Windows.dll is part of the Silverlight framework and exists on a client system when they install Silverlight.

You can see this by reading the documentation (MSDN).  Or you can see how different these Application classes are by doing the following:

  • In the WPF application, open the App.xaml.cs file, right-click on Application and choose Go To Definition
    • You’ll see that the Application class has a Run method and a StartupUri property, but no RootVisual property
    • Now hover over the tab for this window in Visual Studio–you’ll see a temp filename that contains the name “PresentationFramework.dll”
  • In the Silverlight application, open the App.xaml.cs file, right-click on Application and choose Go To Definition
    • You’ll see a very different Application class, with a RootVisual property, but no Run method
    • Hover over the tab again–you’ll see a temp file name containing “System.Windows.dll”

Let’s Stop Here

That’s a good stopping point, for now.  We’ve looked just a little bit under the covers in the Silverlight application–enough to see that the main Application object loaded at runtime is very different from the object loaded in the WPF application.

Learning Out Loud

I’ve always sort of figured that this blog was a place to post things I was just learning, rather than a place to publish tutorials about technologies that I have more expertise in.

Because of the nature of our field, and the amount of new technologies that are always coming out, I’m far more interested in learning than I am in teaching.  There are already plenty of great teachers out there who are blogging, writing or lecturing.  I don’t really aspire to sell myself as a teacher of technologies—that would take far too much time and energy.

Instead, I see this blog as a forum for my attempts to learn new technologies—e.g. WPF and Silverlight.  I’m always looking for new ways to motivate myself to learn new technologies and having a blog is a good way to force myself to dive in and start learning something new.  When I realize that I haven’t posted anything for a few days, I feel the urge to start pulling together the next post.  Then, because I know I’m going to have to write about it, I find that I force myself to explore whatever the topic is in a much deeper manner than I would if I were just reading a book or attending a class.

This has been working out great so far.  I’m discouraged by how little time I have to study these new technologies.  I’d like to post far more frequently than I do.  But at least I’m gradually learning some new bits and pieces, about technologies like WPF and Silverlight.

Reminding myself of my goals also helps me to just relax and not worry so much about making mistakes.  I’m just capturing on “paper” what I’m learning, as I learn it.  Since I’m only beginning the journey of grokking whatever it is, I don’t need to worry about whether I get it right or not.

Remembering all of this led me to change the tagline of this blog.  Instead of offering up my thoughts on various topics, I now see this as “learning out loud”.  That perfectly describes what I think I’m doing—learning new stuff, stumbling through it, and capturing the current state of my knowledge so that I can come back and refer to it later.

So let the journey continue—there’s still so much to learn!

Hello Silverlight World, part 1 – Generating the Project

In my last Silverlight post, we got all of the Silverlight bits installed.  Now it’s time to build a super simple “Hello world” example and then look at the bits and pieces that go into a basic Silverlight app.  I’ll also compare the wizard-generated Silverlight application with the same application done in WPF.  (See my WPF hello-world samples: part 1, part 2 – Why XAML, and part 3 – Forms and Windows.

Let’s start with the obvious–create a Silverlight project in Visual Studio 2008, using the New Project wizard.  (I’m assuming that you’ve installed everything that you need for Silverlight).

We’re going to use C# and target version 3.5 of the .NET Framework.  You’ll see that there are templates for two different Silverlight project types:

  • Silverlight Application
  • Silverlight Class Library

Project wizard

Lovely.  We’ll create a simple “Silverlight Application”.

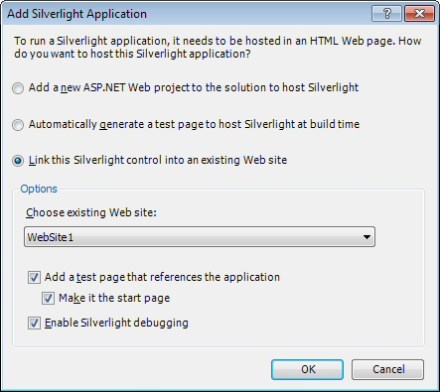
Before the project is actually created, we see a dialog asking us where we want to host our Silverlight Application.  Because Silverlight is a web-based technology, it has to actually be hosted in a web page somewhere.  Visual Studio is willing to generate a new project that will contain the test page.  Here’s the dialog that is shown, when creating a new Silverlight project in an empty solution:

Hosting Options

Here’s some more detail on what each of the three options means:

  • Add new ASP.NET Web project to the solution – creates a new solution with two projects: your Silverlight Application project and a new ASP.NET Web Application project.  The ASP.NET project will look like a typical new ASP.NET Web Application, except that it will also contain a test .aspx page and test .html page for hosting the Silverlight content.  You can also choose “ASP.NET Web Site” as your ASP.NET project type, rather than “ASP.NET Web Application”.  With a Web Application, you have to rebuild and re-publish a DLL to deploy, rather than having everything compiled dynamically (see this addressed in StackOverflow).  In most cases, you’ll want an ASP.NET Web Application.
  • Automatically generate a test page to host Silverlight at build time – In this case, you get a new solution with a single project—the Silverlight Application project.  You don’t have the overhead of a full test project for hosting the Silverlight content.  Instead, when you build the project, you’ll get a test page (TestPage.html) that shows up in your \Bin\Debug or \Bin\Release directory.  The test page is automatically set up to host the Silverlight content from your Silverlight Application project.
  • Link this Silverlight control into an existing Web site – This option will be available if you start with a solution containing an ASP.NET Web Application or Web Site and add your new Silverlight project to that solution.  The Silverlight Application project will be created in the existing solution.  The wizard will also offer to create a test page in the existing site (see below).  If you choose to create the test page, you’ll get an .aspx and an .html version, as before.

Link to Existing Site

In general, if you’re starting fresh, you’ll want the first option—Add a new ASP.NET Web project to the solution.

The Project Structure

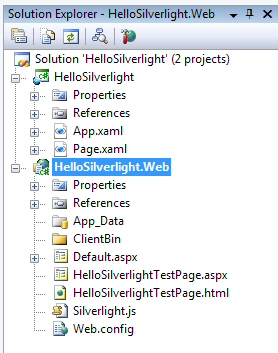
If we choose the first option, here is what the resulting solution looks like:

Solution

So at this point, we have a project for our Silverlight content—HelloSilverlight, and an ASP.NET Web Application project to host the content—HelloSilverlight.Web.

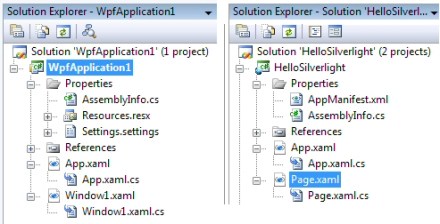
For the moment, let’s focus on the HelloSilverlight project and compare it to its counterpart WPF Application.  Here are both projects, laid out side by side (WPF on the left):

WPF Vs Silverlight

Forms, Windows and Pages

Before we dive into the pieces of the project, there is some interesting terminology to talk about.  In my Hello WPF World, part 3 post, I talked about the difference between a classic Win Forms application and a WPF application.  Under Win Forms, your main window is called a “form”, and this technology goes back at least as far as Visual Basic 3.  (Further)?  With WPF, the terminology changed slightly, in that you’re working with a “window”, rather than a “form”.  And with Silverlight, our main GUI surface is called a “page”.

In one sense, this is just semantics.  Whether we call our main design surface a form, a window, or a page, it’s really just an area of the screen that a user interacts with.  But it’s interesting to think about where these terms come from, especially when thinking about “forms” vs. “pages”.  If we think about paper equivalents to what we’re creating in software, we started creating “forms”—bringing to the computer the process of a human filling out a paper form.  The idea is that they had a sheet with a bunch of empty boxes and they filled in the information.  In the case of a “page”, we inherit the term from the world of web “pages”.  Here the paper equivalent is very different—a page is just a static sheet containing information that you read.

Maybe I’m belaboring the point.  I just find it interesting that in the past we’ve used both “form” and “page” to refer to a user interface surface, and that the corresponding elements in the paper-based world are so different from each other.

In the case of Silverlight, we’re working with “pages”.  We inherit the terminology because we’re writing web-based software, and the web started out serving up static “pages” of content–a very good match for the corresponding real-world idea of a paper page.  But even though Silverlight is presenting a fully interactive user surface–more of a “form”–we’re using the term “page” because of the history.  Perhaps it’s just the case that the term “page” has evolved to mean something new—an interactive and dynamic surface for displaying information and gathering input.

Back to the Silverlight Project

Let’s get back on track and go compare our new Silverlight project to its counterpart in the WPF world.

The Application Manifest

AppManifest.xml is a file that we have in our Silverlight application, but not in the WPF application.  In Silverlight, AppManifest is the application level manifest that describes the constituent DLLs that we are deploying, and their entry points.  In our project, you’ll see that AppManifest.xml is basically empty.  But if you build the application, you’ll see that an AppManifest.xaml file is generated in the output directory.  Looking at AppManifest.xaml, you’ll see that we list one DLL that we are deploying, HelloSilverlight.dll, and that the name of this assembly is “HelloSilverlight”.

So the application manifest is basically a bootstrapper for the Silverlight runtime, telling it which assemblies need to be loaded.  Note that we also still have a manifest inside our HelloSilverlight.dll file, as well.  This is just a standard .NET assembly manifest.

AssemblyInfo

Comparing the AssemblyInfo.cs file in the Silverlight app to its counterpart in our WPF application, they are quite similar.  The obvious difference is that the Silverlight application does not include the ThemeInfo attribute for defining theme-specific resource dictionaries.  As far as I can tell, this is not supported in Silverlight.

Resources

The next difference between the WPF and Silverlight projects is that the default WPF application contains the Resources.resx and Resources.Designer.cs files.  If you haven’t used resources before, the general idea is to move all of your localizable strings from the code out into a resource file and then create a separate resource file for each target language that you want to support.  The appropriate resource file is then loaded automatically at run-time and your code picks up the localized string because it is loading strings from the resource file, rather than the strings coming directly from your XAML (or from the code).

The default Silverlight application project doesn’t have a resource file in the project by default.  You can easily add one, however, and load your strings from the resource file.  It’s not completely clear why the file is not created by default.  Perhaps the goal is just to reduce the size of the final .xap file, since it will be downloaded to the client.  Or perhaps the thinking is that you’d be less likely to want to localize a web-based application vs. a thick client.

Settings File

Similarly, the Silverlight project does not include a settings file (Settings.settings).  In WPF, this is where you would write/read application settings which you want to persist between sessions.  You end up with a configuration file, e.g. Myapp.exe.config, in the same directory as your .exe.  But because the Silverlight control running on the client has no access to the file system, you can’t use .config files as a mechanism for persisting application settings.

Let’s Stop There

This is a good place to stop.  I’ll continue comparing the WPF and Silverlight applications next time and we’ll start looking at what happens at runtime, when rendering the Silverlight control in a browser.

Why Can’t I Drag Silverlight Controls into the Designer?

We’re all spoiled.  For years, we’ve been able to drag/drop controls onto a design surface in Visual Studio and then write the code-behind.  Traditionally, our world has consisted of these two things–the design surface and the code-behind.

But with WPF and Silverlight, we really have three views: the design surface, the XAML code that defines the visual layout, and the code-behind.

When working on WPF projects then, you typically have a split window where you can work in either the design surface or the XAML code.  You can drag controls from the toolbox onto the design surface and the changes are reflected immediately in the XAML.  Conversely, you can edit the XAML and see changes on the design surface.  It looks like this.

WPF Designer

This is beautiful.  You can work in the classic drag/drop paradigm to quickly gen up your GUI.  And then you can tweak things in the XAML, or the property editor.  Life is good.

Silverlight – Something’s Missing!

But there is a bit of a difference when you’re working with Silverlight projects.  Take a look at that same split designer view:

Silverlight Designer

Notice the difference?  “Preview”, rather than “Design”.  You’ll also notice right away that you can’t drag controls onto the design surface.  Argh, I can’t live without drag/drop—these are habits that I picked up back in the days of VB3!

Relax.  Turns out that you can still drag/drop into the XAML, and your changes will be reflected in the Preview window.  The Silverlight designer is different from WPF in that this window is a read-only view of your GUI, rather than a directly-editable designer.  The other bad news is that there is no property window when editing Silverlight XAML, whereas there is when you’re working with the XAML in a WPF application.

You can read all about the Silverlight designer and its limitations here: Silverlight Tools for Visual Studio 2008 Designer Support

While this isn’t ideal, it’s workable.  Perhaps we’ll see the ability to edit directly on the design-surface in future versions of Visual Studio.  Being a newer technology, it’s sensible that Silverlight lags a bit behind WPF in terms of tooling support, in the same way that WPF seems to still lag a bit behind Win Forms.

Session – WPF: Extensible BitmapEffects, Pixel Shaders, and WPF Graphics Futures

PDC 2008, Day #4, Session #4, 1 hr 15 mins

David Teitlebaum
Program Manager
WPF Team

My final session at PDC 2008 was a talk about the improvements in WPF graphics that are available in .NET Framework 3.5 SP1.  David also touched briefly some possible future features (i.e. that would appear in .NET Framework 4.0).

David’s main topic was to walk through the details of the new Shader Effects model, which replaces the old Bitmap Effects feature.

What are Bitmap Effects?

These are effects that are applied to an individual UI element, like a button, to create some desired visual effect.  This includes things like drop shadow, bevels and blur effects.

BitmapEffect

The BitmapEffect object was introduced in Framework 3.0 (the first WPF release).  But there were some problems with it, that led to now replacing it with Shader Effects in 3.5SP1.

Problems with BitmapEffect:

  • They were rendered in software
  • Blur operations were very slow
  • There were various limitations, including no ClearType support, no anisotripic filtering, etc.

New Shader Effects

Basic characteristics in the new Shader Effects include:

  • GPU accelerated
  • Have implemented hardware acceleration of the most popular bitmap effects
    • But did not implement outer glow
  • Can author custom hardware-accelerated bitmap effects using HLSL
  • There is a software-only fallback pipeline that is actually faster than the old Bitmap Effects
  • New Shader Effects run on most video cards
    • Require PixelShader 2.0, which is about 5 years old

How Do You Do Shader Effects?

Here’s an outline of how you use the new Shader Effect model:

  • Derive a custom class from the new ShaderEffect class (which derives from Effect)
  • You write your actual pixel shader code in HLSL, which is used for doing custom hardware-accelerated stuff using Direct3D
    • Language is C-like
    • Compiled to byte-code, consumed by video driver, runs on GPU
  • Some more details about HLSL, as used in WPF
    • DirectX 10 supports HLSL 4.0
    • WPF currently only supports Pixelshader 2.0

So what do pixel shaders really do?  They basically take in a texture (bitmap) as input, do some processing on each point, and return a revised texture as an output.

Basically, you have a main function that accepts the coordinates of the current single pixel to be mapped.  Your code then accesses the original input texture through a register, so it just uses the input parameter (X/Y coordinate) to index into the source texture.  It then does some processing on the pixel in question and returns a color value.  This resultant color value just represents—the resulting RGB color at the specified coordinate.

The final step is to create, in managed code, a class that derives from ShaderEffect and hook it up to the pixel shader code (e.g. xyz.ps file) that you wrote.  You can then apply your shader to any WPF UIElement using XAML.  (By setting the Effect property).

Direct3D Interop

David’s next topic was to talk a bit about interop’ing with Direct3D.  This just means that your WPF application can easily host Direct3D content by using a new class called D3DImage.

This was pretty cool.  David demoed displaying a Direct3D wireframe in the background (WPF 3D subsystem can’t do wireframes), with WPF GUI elements in the foreground, overlaying the background image.

The basic idea is that you create a Direct3D device in unmanaged code and then hook it to a new instance of a WPF D3DImage element, which you include in your visual hierarchy.

WPF Futures

Finally, David touched very briefly on some possible future features.  These are things that may show up in WPF 4.0 (.NET Framework 4.0), or possibly beyond that.

Some of the features likely included in WPF 4.0 include:

  • Increased graphical richness  (e.g. Pixelshader 3.0)
  • Offloading more work to the GPU
  • Better rendering quality
    • Integrate DirectWrite for text clarity
    • Layout rounding

And some of the possible post-4.0 features include:

  • Better exploitation of hardware
  • Vertex shaders
  • Shader groups
  • Shaders in WPF 3D
  • 3D improvements
  • Better media extensibility

References

You can get at David’s PDC08 slide deck for this talk here: http://mschnlnine.vo.llnwd.net/d1/pdc08/PPTX/PC07.pptx

And you can find full video from the session at:  http://mschnlnine.vo.llnwd.net/d1/pdc08/WMV-HQ/PC07.wmv

Session – Microsoft .NET Framework: Overview and Applications for Babies

PDC 2008, Day #1, Session #5, 1 hr 15 min.

Scott Hanselman

There’s no way that I was going to miss Hanselman’s talk.  I’m a big fan of his podcasts—Scott is one of the most knowledgeable tech podcasters out there and he can also be pretty entertaining.  I’m always amazed listening to Scott’s podcasts.  Some guest will be talking about the esoterics of some new platform or service and Scott will just “get it”, quickly grokking what the guy is talking about and end up summarizing it in a nice way.

Scott’s talk didn’t disappoint.  I got to the room early and got a front row seat.  Scott also wins the prize for speaking in the most comfy room at the convention center—the talk was in a cozy little theatre with cushy theatre chairs.

The goal of Scott’s talk was to take a spin around some of the newer (3.5 and 4.0) areas of the .NET Framework.  The vehicle was by extending his WPF BabySmash application to use as many features and services as possible.

BabySmash was the little application that Scott used to teach himself WPF.  He’s blogged about his adventures with BabySmash and learning WPF.

I didn’t take notes during Scott’s session, but let’s see if I can remember the different .NET technologies that Scott dabbled in with BabySmash:

  • Silverlight 2
  • Windows Mobile
  • Surface
  • ADO.NET Data Services
  • Entity Framework
  • New ASP.NET charts/graphs

Basically, Scott ported BabySmash to each of these platforms, or made use of the platform to add some new feature to BabySmash.  It was a great way, using a little app like BabySmash, to illustrate how these technologies fit together.

The grand finale was having all of Scott’s Twitter “minions” go to an online BabySmash web page, which collected metrics about which keys were being pressed.  Scott then displayed a live histogram on an ASP.NET page, showing the distribution of the keys pressed.  It’s a testament to Scott’s popularity that the graph grew quickly, with the frequency for some letters quickly moving into the thousands.

What’s even more amazing is that Scott said he hadn’t tested the Twitter app, at least in a broad/distributed way, until the talk.  Very cool.

I can’t really add much to what Scott writes himself.  So do yourself a favor and check him out at hanselman.com.

Session – Microsoft Silverlight, WPF and the Microsoft .NET Framework: Sharing Skills and Code

PDC 2008, Day #1, Session #4, 1 hr 15 min.

Ian Ellison-Taylor

This session focused on sharing code between WPF and Silverlight applications.  How easy is it to take an existing WPF application and run it in the cloud by converting it to Silverlight 2?  Conversely, how easy is it to take a Silverlight 2 application and run it locally as a WPF application?

The bottom line is that it’s really quite easy to run the same application as either a local WPF application or a cloud-based Silverlight 2 app, with just a few modifications.

Ian started with a quick summary of when you’d want to use WPF vs. Silverlight 2:

  • WPF: best for desktop apps needing maximum performance and leveraging 3D graphics on the desktop
  • Silverlight 2: best for RIAs, smaller and lighter, able to run on various platforms and in various browsers

One of the more interesting parts of the talk was Ian’s description of the history of Silverlight 2.  We know that Silverlight 2 uses a smaller version (much smaller) of the .NET Framework, which it deploys via the browser, if a client needs it.

But Ian described how, in the first attempt at a Silverlight 2 framework (WPF/e at the time), they started with the full framework and started pulling stuff out.  They quickly found, however, that it made more sense to start with a clean slate and then only pull in the bits that they needed for Silverlight 2.

Applications written in WPF or Silverlight 2 can be moved to the other platform fairly easily, but Ian said that it was a bit easier to convert Silverlight 2 apps to run as WPF than the other way around.  This makes sense—WPF apps might be using parts of the full .NET framework that aren’t supported in the Silverlight 2 subset.

Also interesting, Ian suggested that developers start by learning Silverlight 2 and then moving to WPF, rather than the other way around.  Things are done in Silverlight 2 in a much simpler way, so the learning curve will likely be shorter.  As an example, he talked about the property system, which is far more complex in WPF.

This was an excellent talk, with some nice demos.  Ian worked simultaneously on a WPF and a Silverlight 2 application, adding features to one and then moving them over to the other platform.  It was an excellent way to highlight some of the differences and the gotchas that developers will run into.  But it also showed off how similar the platforms are and how easy it is to migrate an app from one to the other.

I WPF, Therefore I Blend

If you’re a developer doing WPF development, you really need to be using Expression Blend.

Yes, I know the party line on WPF development runs something like this:

  • Every dev team should have at least 1 developer and 1 designer
  • Developers can’t design decent-looking GUIs to save their soul
  • Designers can’t be trusted with code, or anything close to code (excepting XAML)
  • Devs will open a project in Visual Studio and do all of their work there
  • Designers will open the same project in Blend and do all of their work there
  • Devs wear button-up shirts that don’t match their Dockers
  • Designers wear brand-name labels and artsy little berets

I don’t quite buy into the idea of a simple developer/designer separation, with one tool for each of them.  (I also don’t wear Dockers).

It’s absolutely true that Blend makes it easier for a designer to be part of the team and work directly on the product.  The old model was to have the designers do static mockups in Photoshop and then have your devs painstakingly reproduce the images, working in Visual Studio.  The old model sucks.

The new model, having Blend work directly with XAML and even open the same solution file as Visual Studio, is a huge advancement.  Designers get access to all of the flashy photoshoppy features in Blend, which means that they can do their magic and create something that actually looks great.  And devs will instantly get the new GUI layout when they use Visual Studio to open/run the project.

The problem that I have with the designer/developer divide is as follows.  To achieve an excellent user experience takes more than just independently creating form and function and then marrying the two together.  A designer might create GUI screens that are the most beautiful thing on the planet.  And the dev working with him might write the most efficient and elegant code-behind imaginable.  But this isn’t nearly enough to guarantee a great user experience.

User experience is all about user interaction.  Poorly done user interaction will lead to a failed or unused application far more quickly than either an ugly GUI or poorly performing code.

So what exactly is “user interaction”?  In my opinion, it’s everything in the application except for the code and the GUI.  User interaction is all about how the user uses your application to get her work done (or to create what she wants to create).  Does the application make sense to her?  Does using it feel natural?  Allow her to be efficient?  Are features discoverable?  Does the flow of the application match her existing workflow?

The only way to get user interaction correct is to know your user.  This means truly understanding the problem that your users are trying to solve, as well as what knowledge they have about the problem space.

There is an easy four step process to get at this information: 1) talk to the users; 2) prototype; 3) observe them using the prototype; 4) repeat.

There are a whole host of specific strategies to help you in this process, including things like: use cases, user stories, storyboarding, etc.  The literature is full of good processes and techniques for working early and often with users to get both the right set of functionality and a great user experience.

But let’s get back to designers and developers.  The reason that I don’t buy into the clean GUI/code split (or code + markup, if you’re a Petzold fan) is that good user interaction requires both code and markup.  Somebody needs to be responsible for the user interaction model and it should come first, requiring some code and some markup.

If you do buy into the devs-Studio/designers-Blend party line for WPF development, there are two simplistic approaches that you might be tempted to take, both equally bad:

  • Developer codes up all required functionality, puts API on it and designer creates screens that call into the API
  • Designer mocks up screens and then developers create code behind those screens to get desired functionality

The problem behind both approaches is, of course, that no one is focused on how the user is using the application.  The designer is thinking about the user in aesthetic terms and that’s a huge improvement over a battleship grey GUI.  But it’s not nearly enough–not if your goal is to achieve a great user experience.

If someone needs to be responsible for the user experience, it should be the developer.  If you are lucky enough to be working with a designer, the developer is still the team member that drives the entire process.  The designer is likely working in support of the developer, not the other way around.  (Note: I’m talking here about developing rich WPF client software, rather than web-based sites or applications.  With web-based projects, it’s likely the designer that is driving the project).

My vote is for a process that looks something like the following:

  • Developer initiates requirements gathering through user stories and use cases
  • Developer starts sketching up storyboards, with input from designer
  • Developer builds prototype, using both Visual Studio and Blend
  • Team presents prototype to user, walks through use cases, gets feedback, iterates
    • Important to focus here on how the user works w/application, rather than how it looks
  • As pieces of user interaction solidify
    • Designer begins refining those pieces of GUI for aesthetics, branding, etc.
    • Developer begins fleshing out code behind and full functionality
  • Continue iterating/reviewing with user

You might agree with this process, but say that the developer should work exclusively in Visual Studio to generate the prototypes.  Why is it important for them to use Blend for prototyping and iterating with the user?

The simple truth is that Blend is far superior to Visual Studio for doing basic GUI layout.  Using Visual Studio, you can definitely set property values using the property grid or by entering XAML directly.  But the property editors in Blend make it much easier to quickly set properties and tweak controls.

Given that the developer should be doing the GUI prototyping, I think it makes sense for them to use both Blend and Visual Studio, rather than just Visual Studio alone.

The bottom line is this: the choice of using Blend vs. Visual Studio should be based on the task that you are doing, rather than who is doing that task.  Instead of Blend just being a tool for designers and Visual Studio a tool for developers, it’s more true that Blend is a tool for doing GUI design and Visual Studio a tool for writing/debugging code.  Given that I think the developer should be the person responsible for early prototyping of the GUI, they should be using both Blend and Visual Studio during the early phases of a project.

So if you’re a developer just getting into WPF, don’t write off Blend as an artsy-fartsy tool for designers.  Instead, just think of it as a GUI design tool.  Though you may not be great at putting together beautiful user interfaces, it’s definitely your job to create the early GUI prototypes.  You may not be responsible for the design of the GUI, but you should be responsible for designing the GUI.  So if you WPF, you really ought to Blend.  Who knows?  You might like it so much that you start wearing a beret.

Writing a Screen Saver in WPF

I take my Raindrop Animation from last time and converted it into a screen saver, complete with a Settings dialog, to allow tweaking the various parameters.

Note: Full source code available on Codeplex, at: http://wavesimscrsaver.codeplex.com/

Last time, I created a WPF application that displayed an animated simulation of raindrops falling on water.  It was a little work, but not a huge effort, to convert that application into a Windows screen saver.

A screen saver is mainly just a regular .exe file with a .scr extension that has been copied into your C:\Windows\system32 directory.  In the simplest implementation, your application will just run when the screen saver kicks in.  But a fully functional screen saver in Windows will also support two additional features—running in the little preview window in the Screen Saver dialog and providing a customization GUI that is launched from the Settings button in the Screen Saver dialog.  You’ll also want to tweak the normal runtime behavior so that your application runs maximized, without window borders, and responds to mouse and/or keyboard events to shut down gracefully.

Our existing Raindrops WPF application runs in a WPF window.  We can easily tweak its behavior to run maximized and without a window border.  But we also need to interpret command line parameters so that we can decide which of the three following modes to run in:

  • Normal  (run screen saver maximized)
  • Preview  (run screen saver that is hosted in the little preview window)
  • Settings  (show dialog allowing user to tweak settings)

The first thing that we need to do is to change the main Application object in our WPF application and tell it not to start up a window, but to execute some code.  We remove the StartupUri property (was set to “Window1.xaml”) and replace it with a Startup property that points to an Application_Startup method.

Here is the modified App.xaml code:


<Application x:Class="WaveSim.App"
    xmlns="http://schemas.microsoft.com/winfx/2006/xaml/presentation"
    xmlns:x="http://schemas.microsoft.com/winfx/2006/xaml"
    Startup="Application_Startup">
    <Application.Resources>

    </Application.Resources>
</Application>

The bulk of our changes will be in the new Application_Startup method.  It’s here that we parse the command line and figure out what mode we should run under.  The Screen Saver mechanism and dialog uses the following API to tell a screen saver how to run:

  • /p handle    Run in preview mode, hosting inside preview window whose handle is passed in
  • /s        Run in normal screen saver mode (full screen)
  • /c        Run in settings (configuration) mode, showing GUI to change settings

Here are the entire contents of App.xaml.cs, with the command line parsing logic:

using System;
using System.Collections.Generic;
using System.Configuration;
using System.Data;
using System.Drawing;
using System.Linq;
using System.Windows;
using System.Windows.Interop;
using System.Runtime.InteropServices;
using System.Windows.Media;

namespace WaveSim
{
    /// <summary>
    /// Interaction logic for App.xaml
    /// </summary>
    public partial class App : Application
    {
        // Used to host WPF content in preview mode, attach HwndSource to parent Win32 window.
        private HwndSource winWPFContent;
        private Window1 winSaver;

        private void Application_Startup(object sender, StartupEventArgs e)
        {
            // Preview mode--display in little window in Screen Saver dialog
            // (Not invoked with Preview button, which runs Screen Saver in
            // normal /s mode).
            if (e.Args[0].ToLower().StartsWith("/p"))        
            {
                winSaver = new Window1();

                Int32 previewHandle = Convert.ToInt32(e.Args[1]);
                //WindowInteropHelper interopWin1 = new WindowInteropHelper(win);
                //interopWin1.Owner = new IntPtr(previewHandle);

                IntPtr pPreviewHnd = new IntPtr(previewHandle);

                RECT lpRect = new RECT();
                bool bGetRect = Win32API.GetClientRect(pPreviewHnd, ref lpRect);

                HwndSourceParameters sourceParams = new HwndSourceParameters("sourceParams");

                sourceParams.PositionX = 0;
                sourceParams.PositionY = 0;
                sourceParams.Height = lpRect.Bottom - lpRect.Top;
                sourceParams.Width = lpRect.Right - lpRect.Left;
                sourceParams.ParentWindow = pPreviewHnd;
                sourceParams.WindowStyle = (int)(WindowStyles.WS_VISIBLE | WindowStyles.WS_CHILD | WindowStyles.WS_CLIPCHILDREN);

                winWPFContent = new HwndSource(sourceParams);
                winWPFContent.Disposed += new EventHandler(winWPFContent_Disposed);
                winWPFContent.RootVisual = winSaver.grid1;
            }

            // Normal screensaver mode.  Either screen saver kicked in normally,
            // or was launched from Preview button
            else if (e.Args[0].ToLower().StartsWith("/s"))     
            {
                Window1 win = new Window1();
                win.WindowState = WindowState.Maximized;
                win.Show();
            }

            // Config mode, launched from Settings button in screen saver dialog
            else if (e.Args[0].ToLower().StartsWith("/c"))     
            {
                SettingsWindow win = new SettingsWindow();
                win.Show();
            }

            // If not running in one of the sanctioned modes, shut down the app
            // immediately (because we don't have a GUI).
            else
            {
                Application.Current.Shutdown();
            }
        }

        /// <summary>
        /// Event that triggers when parent window is disposed--used when doing
        /// screen saver preview, so that we know when to exit.  If we didn't
        /// do this, Task Manager would get a new .scr instance every time
        /// we opened Screen Saver dialog or switched dropdown to this saver.
        /// </summary>
        ///
<param name="sender"></param>
        ///
<param name="e"></param>
        void winWPFContent_Disposed(object sender, EventArgs e)
        {
            winSaver.Close();
//            Application.Current.Shutdown();
        }
    }
}

The most complicated thing about this code is what we do in preview mode.  We need to basically take our WPF window and host it inside an existing Win32 window—the little preview window on the Screen Saver dialog.  To start with, all we have is the handle of this window.  The trick is to create a new HwndSource object, specifying the desired size and who we want for a parent window.  Then we attach our WPF window by changing the HwndSource.RootVisual property.  We also hook up an event handler so that we know when the window gets disposed.  When the parent window goes away, we need to make sure to shut our application down (or it will continue to run).

Running in normal screen saver mode is the most straightforward of the three options.  We simply instantiate our Window1 window and show it.

For settings/configuration mode, we show a new SettingsWindow window that we’ve created.  This window will display some sliders to let the user change various settings and it will also persist the new settings to an .xml file.

The Raindrop settings are encapsulated in the new RaindropSettings class.  This class just contains public (serializable) properties for the various things we want to tweak, and it includes Save and Load methods that serialize the properties to an .xml file and read them back in.

It’s important that we serialize these properties in an .xml file because the screen saver architecture doesn’t expect to display a settings dialog while the screen saver is running.  Instead, it expects to run the application once to allow the user to change settings and then run again to show the screen saver.

Here is the full code for the RaindropSettings class.  Note that we use auto-implemented properties so that we don’t have to write prop getter/setter code:

using System;
using System.Collections.Generic;
using System.IO;
using System.Linq;
using System.Text;
using System.Xml.Serialization;

namespace WaveSim
{
    /// <summary>
    /// Persist raindrop screen saver settings in memory and provide support
    /// for loading from file and persisting to file.
    /// </summary>
    public class RaindropSettings
    {
        public const string SettingsFile = "Raindrops.xml";

        public double RaindropPeriodInMS { get; set; }  
        public double SplashAmplitude { get; set; }
        public int DropSize { get; set; }
        public double Damping { get; set; }

        /// <summary>
        /// Instantiate the class, loading settings from a specified file.
        /// If the file doesn't exist, use default values.
        /// </summary>
        ///
<param name="sSettingsFilename"></param>
        public RaindropSettings()
        {
            SetDefaults();      // Clean object, start w/defaults
        }

        /// <summary>
        /// Set all values to their defaults
        /// </summary>
        public void SetDefaults()
        {
            RaindropPeriodInMS = 35.0;
            SplashAmplitude = -3.0;
            DropSize = 1;
            Damping = 0.96;
        }

        /// <summary>
        /// Save current settings to external file
        /// </summary>
        ///
<param name="sSettingsFilename"></param>
        public void Save(string sSettingsFilename)
        {
            try
            {
                XmlSerializer serial = new XmlSerializer(typeof(RaindropSettings));

                FileStream fs = new FileStream(sSettingsFilename, FileMode.Create);
                TextWriter writer = new StreamWriter(fs, new UTF8Encoding());
                serial.Serialize(writer, this);
                writer.Close();
            }
            catch { }
        }

        /// <summary>
        /// Attempt to load settings from external file.  If the file doesn't
        /// exist, or if there is a problem, no settings are changed.
        /// </summary>
        ///
<param name="sSettingsFilename"></param>
        public static RaindropSettings Load(string sSettingsFilename)
        {
            RaindropSettings settings = null;

            try
            {
                XmlSerializer serial = new XmlSerializer(typeof(RaindropSettings));
                FileStream fs = new FileStream(sSettingsFilename, FileMode.OpenOrCreate);
                TextReader reader = new StreamReader(fs);
                settings = (RaindropSettings)serial.Deserialize(reader);
            }
            catch {
                // If we can't load, just create a new object, which gets default values
                settings = new RaindropSettings();     
            }

            return settings;
        }
    }
}

Here is the .xaml for our SettingsWindow class.  The window will contain four sliders, one for each setting.  It also includes a button that resets everything back to the default values.  When the user clicks the OK button, all settings are persisted to the RaindropSettings.xml file.  (There is no cancel function).

<Window x:Class="WaveSim.SettingsWindow"
    xmlns="http://schemas.microsoft.com/winfx/2006/xaml/presentation"
    xmlns:x="http://schemas.microsoft.com/winfx/2006/xaml"
    Title="Raindrop Screensaver Settings" Height="300" Width="300">
    <Grid>
        <Button Height="23" Margin="0,0,48,17" Name="btnClose" VerticalAlignment="Bottom" Click="btnClose_Click" HorizontalAlignment="Right" Width="76">OK</Button>
        <Slider Height="21" Margin="0,27,10,0" Name="slidNumDrops" VerticalAlignment="Top" Minimum="1" Maximum="1000" AutoToolTipPlacement="BottomRight" HorizontalAlignment="Right" Width="164" ValueChanged="slidNumDrops_ValueChanged" />
        <Label Height="28" Margin="24,25,0,0" Name="label1" VerticalAlignment="Top" HorizontalAlignment="Left" Width="70">Num Drops</Label>
        <Button Height="23" HorizontalAlignment="Left" Margin="43,0,0,17" Name="btnDefaults" VerticalAlignment="Bottom" Width="76" Click="btnDefaults_Click">Defaults</Button>
        <Label Height="28" HorizontalAlignment="Left" Margin="6,66,0,0" Name="label2" VerticalAlignment="Top" Width="88">Drop Strength</Label>
        <Slider AutoToolTipPlacement="BottomRight" Height="21" Margin="104,70,10,0" Maximum="15" Minimum="0" Name="slidDropStrength" VerticalAlignment="Top" ValueChanged="slidDropStrength_ValueChanged" />
        <Label HorizontalAlignment="Left" Margin="29,111,0,123" Name="label3" Width="61">Drop Size</Label>
        <Slider AutoToolTipPlacement="BottomRight" Margin="104,114,10,127" Maximum="6" Minimum="1" Name="slidDropSize" ValueChanged="slidDropSize_ValueChanged" />
        <Label Height="28" HorizontalAlignment="Left" Margin="30,0,0,79" Name="label4" VerticalAlignment="Bottom" Width="61">Damping</Label>
        <Slider AutoToolTipPlacement="BottomRight" Height="21" Margin="104,0,10,83" Maximum="100" Minimum="50" Name="slidDamping" VerticalAlignment="Bottom" ValueChanged="slidDamping_ValueChanged" SmallChange="0.01" LargeChange="0.1" />
    </Grid>
</Window>

And here is the full code for SettingsWindow.xaml.cs.  When we load the window, we read in settings from the .xml file and change the value of the sliders.  When the user clicks OK, we just save out the current settings to RaindropSettings.xml.

using System;
using System.Collections.Generic;
using System.Linq;
using System.Text;
using System.Windows;
using System.Windows.Controls;
using System.Windows.Data;
using System.Windows.Documents;
using System.Windows.Input;
using System.Windows.Media;
using System.Windows.Media.Imaging;
using System.Windows.Shapes;

namespace WaveSim
{
    /// <summary>
    /// Interaction logic for SettingsWindow.xaml
    /// </summary>
    public partial class SettingsWindow : Window
    {
        private RaindropSettings settings;

        public SettingsWindow()
        {
            InitializeComponent();

            // Load settings from file (or just set to default values
            // if file not found)
            settings = RaindropSettings.Load(RaindropSettings.SettingsFile);

            SetSliders();
        }

        private void btnClose_Click(object sender, RoutedEventArgs e)
        {
            settings.Save(RaindropSettings.SettingsFile);
            this.Close();
        }

        /// <summary>
        /// Set all sliders to their default values
        /// </summary>
        ///
<param name="sender"></param>
        ///
<param name="e"></param>
        private void btnDefaults_Click(object sender, RoutedEventArgs e)
        {
            settings.SetDefaults();
            SetSliders();
        }

        private void SetSliders()
        {
            slidNumDrops.Value = 1.0 / (settings.RaindropPeriodInMS / 1000.0);
            slidDropStrength.Value = -1.0 * settings.SplashAmplitude;
            slidDropSize.Value = settings.DropSize;
            slidDamping.Value = settings.Damping * 100;
        }

        private void slidDropStrength_ValueChanged(object sender, RoutedPropertyChangedEventArgs<double> e)
        {
            if (settings != null)
            {
                // Slider runs [0,30], so our amplitude runs [-30,0]. 
                // Negative amplitude is desirable because we see little towers of 
                // water as each drop bloops in. 
                settings.SplashAmplitude = -1.0 * slidDropStrength.Value;
            }
        }

        private void slidNumDrops_ValueChanged(object sender, RoutedPropertyChangedEventArgs<double> e)
        {
            if (settings != null)
            {
                // Slider runs from [1,1000], with 1000 representing more drops (1 every ms) and 
                // 1 representing fewer (1 ever 1000 ms).  This is to make slider seem natural 
                // to user.  But we need to invert it, to get actual period (ms) 
                settings.RaindropPeriodInMS = (1.0 / slidNumDrops.Value) * 1000.0;
            }
        }

        private void slidDropSize_ValueChanged(object sender, RoutedPropertyChangedEventArgs<double> e)
        {
            if (settings != null)
            {
                settings.DropSize = (int)slidDropSize.Value;
            }
        }

        private void slidDamping_ValueChanged(object sender, RoutedPropertyChangedEventArgs<double> e)
        {
            if (settings != null)
            {
                settings.Damping = slidDamping.Value / 100;
            }
        }
    }
}

The only remaining thing to be done is to change Window1 to get rid of our earlier sliders and to read in the settings from the .xml file.

Here is the modified Window1.xaml code:

<Window x:Class="WaveSim.Window1"
    xmlns="http://schemas.microsoft.com/winfx/2006/xaml/presentation"
    xmlns:x="http://schemas.microsoft.com/winfx/2006/xaml"
    Title="Window1"
    MouseWheel="Window_MouseWheel" ShowInTaskbar="False" ResizeMode="NoResize" WindowStyle="None"
        MouseDown="Window_MouseDown" KeyDown="Window_KeyDown" Background="Black">
    <Grid Name="grid1">
        <Viewport3D Name="viewport3D1">
            <Viewport3D.Camera>
                <PerspectiveCamera x:Name="camMain" Position="255 38.5 255" LookDirection="-130 -40 -130" FarPlaneDistance="450" UpDirection="0,1,0" NearPlaneDistance="1" FieldOfView="70">

                </PerspectiveCamera>
            </Viewport3D.Camera>
            <ModelVisual3D x:Name="vis3DLighting">
                <ModelVisual3D.Content>
                    <DirectionalLight x:Name="dirLightMain" Direction="2, -2, 0"/>
                </ModelVisual3D.Content>
            </ModelVisual3D>
            <ModelVisual3D>
                <ModelVisual3D.Content>
                    <DirectionalLight Direction="0, -2, 2"/>
                </ModelVisual3D.Content>
            </ModelVisual3D>
            <ModelVisual3D>
                <ModelVisual3D.Content>
                    <GeometryModel3D x:Name="gmodMain">
                        <GeometryModel3D.Geometry>
                            <MeshGeometry3D x:Name="meshMain" >
                            </MeshGeometry3D>
                        </GeometryModel3D.Geometry>
                        <GeometryModel3D.Material>
                            <MaterialGroup>
                                <DiffuseMaterial x:Name="matDiffuseMain">
                                    <DiffuseMaterial.Brush>
                                        <SolidColorBrush Color="DarkBlue"/>
                                    </DiffuseMaterial.Brush>
                                </DiffuseMaterial>
                                <SpecularMaterial SpecularPower="24">
                                    <SpecularMaterial.Brush>
                                        <SolidColorBrush Color="LightBlue"/>
                                    </SpecularMaterial.Brush>
                                </SpecularMaterial>
                            </MaterialGroup>
                        </GeometryModel3D.Material>
                    </GeometryModel3D>
                </ModelVisual3D.Content>
            </ModelVisual3D>
        </Viewport3D>
    </Grid>
</Window>

And here is the updated Window1.xaml.cs.  Note that we also add event handlers to shut down the application when a mouse or keyboard button is pressed.

using System;
using System.Collections.Generic;
using System.Diagnostics;
using System.Linq;
using System.Text;
using System.Windows;
using System.Windows.Controls;
using System.Windows.Data;
using System.Windows.Documents;
using System.Windows.Input;
using System.Windows.Media;
using System.Windows.Media.Media3D;
using System.Windows.Media.Imaging;
using System.Windows.Navigation;
using System.Windows.Shapes;
using System.Windows.Threading;

namespace WaveSim
{
    ///

    /// Interaction logic for Window1.xaml
    ///

    public partial class Window1 : Window
    {
        private Vector3D zoomDelta;

        private WaveGrid _grid;
        private bool _rendering;
        private double _lastTimeRendered;
        private Random _rnd = new Random(1234);

        // Raindrop parameters, from .xml settings file
        private RaindropSettings _settings;

        private double _splashDelta = 1.0;      // Actual splash height is Ampl +/- Delta (random)
        private double _waveHeight = 15.0;

        // Values to try:
        //   GridSize=20, RenderPeriod=125
        //   GridSize=50, RenderPeriod=50
        private const int GridSize = 250; //50;   
        private const double RenderPeriodInMS = 60; //50;

        public Window1()
        {
            InitializeComponent();

            // Read in settings from .xml file
            _settings = RaindropSettings.Load(RaindropSettings.SettingsFile);

            // Set up the grid
            _grid = new WaveGrid(GridSize);
            _grid.Damping = _settings.Damping;
            meshMain.Positions = _grid.Points;
            meshMain.TriangleIndices = _grid.TriangleIndices;

            // On each WheelMouse change, we zoom in/out a particular % of the original distance
            const double ZoomPctEachWheelChange = 0.02;
            zoomDelta = Vector3D.Multiply(ZoomPctEachWheelChange, camMain.LookDirection);

            StartStopRendering();
        }

        private void Window_MouseWheel(object sender, MouseWheelEventArgs e)
        {
            if (e.Delta > 0)
                // Zoom in
                camMain.Position = Point3D.Add(camMain.Position, zoomDelta);
            else
                // Zoom out
                camMain.Position = Point3D.Subtract(camMain.Position, zoomDelta);
        }

        // Start/stop animation
        private void StartStopRendering()
        {
            if (!_rendering)
            {
                //_grid = new WaveGrid(GridSize);        // New grid allows buffer reset
                _grid.FlattenGrid();
                meshMain.Positions = _grid.Points;

                _lastTimeRendered = 0.0;
                CompositionTarget.Rendering += new EventHandler(CompositionTarget_Rendering);
                _rendering = true;
            }
            else
            {
                CompositionTarget.Rendering -= new EventHandler(CompositionTarget_Rendering);
                _rendering = false;
            }
        }

        void CompositionTarget_Rendering(object sender, EventArgs e)
        {
            RenderingEventArgs rargs = (RenderingEventArgs)e;
            if ((rargs.RenderingTime.TotalMilliseconds – _lastTimeRendered) > RenderPeriodInMS)
            {
                // Unhook Positions collection from our mesh, for performance
                // (see http://blogs.msdn.com/timothyc/archive/2006/08/31/734308.aspx)
                meshMain.Positions = null;

                // Do the next iteration on the water grid, propagating waves
                double NumDropsThisTime = RenderPeriodInMS / _settings.RaindropPeriodInMS;

                // Result at this point for number of drops is something like
                // 2.25.  We’ll induce integer portion (e.g. 2 drops), then
                // 25% chance for 3rd drop.
                int NumDrops = (int)NumDropsThisTime;   // trunc
                for (int i = 0; i < NumDrops; i++)                     _grid.SetRandomPeak(_settings.SplashAmplitude, _splashDelta, _settings.DropSize);                 if ((NumDropsThisTime - NumDrops) > 0)
                {
                    double DropChance = NumDropsThisTime – NumDrops;
                    if (_rnd.NextDouble() <= DropChance)                         _grid.SetRandomPeak(_settings.SplashAmplitude, _splashDelta, _settings.DropSize);                 }                 _grid.ProcessWater();                 // Then update our mesh to use new Z values                 meshMain.Positions = _grid.Points;                 _lastTimeRendered = rargs.RenderingTime.TotalMilliseconds;             }         }         private void Window_MouseDown(object sender, MouseButtonEventArgs e)         {             Application.Current.Shutdown();         }         private void Window_KeyDown(object sender, KeyEventArgs e)         {             Application.Current.Shutdown();         }     } } [/sourcecode] Here is a .zip file containing the entire Raindrops Screen Saver project.  After you build it, you’ll need to:

  • Rename WaveSimScrSaver.exe to WaveSimScrSaver.scr
  • Copy WaveSimScrSaver.scr to C:\Windows\system32

Here’s a screen shot of the screen saver running in Preview mode.  This is very satisfying, since getting this to work properly was the hardest part of the project.

Next Steps

There are a few obvious “next steps” to take in this project, including:

  • Stop screen saver on mouse move (stop on large movement, but not small movement)
  • Run screen saver on multiple monitors/screens
  • Allow user to set the background image
  • Allow user to set an image to get mapped onto the surface of the water

Sources

Here are some of the sources that I used in learning how to create and run a screen saver in WPF:

Raindrop Animation in WPF

I’ve expanded a bit on my earlier example of simulating ripples on water in WPF.  Last time, I started a ripple by inducing a single peak value into a grid of points and then watching the ripples propagate.

Full source code available at:  http://wavesim.codeplex.com

This time, we go much further, inducing peaks at random intervals to simulate raindrops falling on a liquid surface.  The underlying algorithm for propagating the ripples is identical to last time—calculating new height values for every point in a 2D mesh, using a basic filtering/smoothing algorithm.

To see the final result right away, you can download/run the WPF application from here.  As before, you can use the mouse wheel to zoom in/out, while the simulation is running.

I’ve updated the GUI to include a few knobs that you can play with.  The three sliders that control the raindrops are:

  • Num Drops – Controls how fast the drops are falling.  For starters, the average time between raindrops is 35ms.  The slider allows changing the frequency, such that the time between drops ranges from 1ms to 1000ms.  (On average)
  • Drop Strength – Controls how deep the drop falls, which impacts the amplitude of the resulting ripples.  Defaults to creating a drop that goes 3.0 units deep, with a range of [0,15].  (Grid is 250×250 units).
  • Drop Size – The diameter of the drop that comes down.  (Actually, drops are square, so this value is the length of one side of the square).  Defaults to 1, range is [1,6].

To start the animation, with the default values, click on the Start Rain button.  You’ll get a nice/natural animated scene, with raindrops falling on the water.  (On my graphics card, at least, this results in an animation that feels close to real-time—this may not be true on slower/faster cards).

The next thing to try playing with is the Num Drops setting, leaving everything else the same.  The raindrop frequency will increase as you move the slider, and you’ll a much more agitated surface, since the ripples don’t have enough time to damp.

Now try turning the Num Drops setting back down low and turn up the Drop Size setting.  Now you’ll get nice fat drops that create pretty good-size ripples.

Finally, set Drop Size back down again and try playing with the Drop Strength setting.  You’ll simulate stronger drops, as we create much deeper craters for each drop initially.  Also notice the little tower of water the jumps up as the first visual indication of a drop.

You can obviously play with all three of the settings at the same time.  Doing so, you can easily get a pretty crazy bathtub effect, as the waves just get larger and larger.

Use of the Wave button is left as an exercise to the reader.  It basically introduces a deep channel across the entire wave mesh, which results in a fairly large wave that propagates out in both directions.

One interesting thing to note about the wave is that you’ll see the existing ripples bend around the wave and continue propagating outward.  Also note that, because we add all amplitudes to existing point heights, new drops that fall on the wave will be at the proper height, relative to the current wave height.

Ok, I can’t resist.  Here’s a screencap of the Wave in action.

Below is the WPF code that I used for the simulation.  As before, the three parts are: a) the static XAML that sets up the window; b) the code-behind for Window1, which runs the Rendering loop and c) the WaveGrid class, which does the actual simulation and contains the two point buffers.

Here is the XAML code for the main window, nothing too spectacular:

<Window x:Class="WaveSim.Window1"
    xmlns="http://schemas.microsoft.com/winfx/2006/xaml/presentation"
    xmlns:x="http://schemas.microsoft.com/winfx/2006/xaml"
    Title="Window1" Height="679.023" Width="812.646"
    MouseWheel="Window_MouseWheel">
    <Grid Name="grid1" Height="618.12" Width="759.015">
        <Grid.RowDefinitions>
            <RowDefinition Height="76*" />
            <RowDefinition Height="542.12*" />
        </Grid.RowDefinitions>
        <Button HorizontalAlignment="Right" Margin="0,11.778,115,0" Name="btnStart" Width="75" Click="btnStart_Click" Height="22.649" VerticalAlignment="Top">Start Rain</Button>
        <Viewport3D Name="viewport3D1" Grid.Row="1">
            <Viewport3D.Camera>
                <PerspectiveCamera x:Name="camMain" Position="255 38.5 255" LookDirection="-130 -40 -130" FarPlaneDistance="450" UpDirection="0,1,0" NearPlaneDistance="1" FieldOfView="70">

                </PerspectiveCamera>
            </Viewport3D.Camera>
            <ModelVisual3D x:Name="vis3DLighting">
                <ModelVisual3D.Content>
                    <DirectionalLight x:Name="dirLightMain" Direction="2, -2, 0"/>
                </ModelVisual3D.Content>
            </ModelVisual3D>
            <ModelVisual3D>
                <ModelVisual3D.Content>
                    <DirectionalLight Direction="0, -2, 2"/>
                </ModelVisual3D.Content>
            </ModelVisual3D>
            <ModelVisual3D>
                <ModelVisual3D.Content>
                    <GeometryModel3D x:Name="gmodMain">
                        <GeometryModel3D.Geometry>
                            <MeshGeometry3D x:Name="meshMain" >
                            </MeshGeometry3D>
                        </GeometryModel3D.Geometry>
                        <GeometryModel3D.Material>
                            <MaterialGroup>
                                <DiffuseMaterial x:Name="matDiffuseMain">
                                    <DiffuseMaterial.Brush>
                                        <SolidColorBrush Color="DarkBlue"/>
                                    </DiffuseMaterial.Brush>
                                </DiffuseMaterial>
                                <SpecularMaterial SpecularPower="24">
                                    <SpecularMaterial.Brush>
                                        <SolidColorBrush Color="LightBlue"/>
                                    </SpecularMaterial.Brush>
                                </SpecularMaterial>
                            </MaterialGroup>
                        </GeometryModel3D.Material>
                    </GeometryModel3D>
                </ModelVisual3D.Content>
            </ModelVisual3D>
        </Viewport3D>
        <Slider Margin="0,13.596,198,0" Name="slidPeakHeight" ValueChanged="slidPeakHeight_ValueChanged" Minimum="0" Maximum="15" HorizontalAlignment="Right" Width="167.256" Height="20.831" VerticalAlignment="Top" />
        <Label Margin="286,11.964,0,36.083" Name="lblDropDepth" HorizontalAlignment="Left" Width="89.015">Drop Strength</Label>
        <Slider Name="slidNumDrops" HorizontalAlignment="Left" Margin="111,15.452,0,0" Maximum="1000" Minimum="1" Width="167.256" ValueChanged="slidNumDrops_ValueChanged" Height="20.831" VerticalAlignment="Top" />
        <Label HorizontalAlignment="Left" Margin="12,13.596,0,34.451" Name="label1" Width="89">Num Drops</Label>
        <Button HorizontalAlignment="Right" Margin="0,11.963,19,0" Name="btnWave" Width="75" Click="btnWave_Click" Height="22.649" VerticalAlignment="Top">Wave !</Button>
        <Slider Height="20.831" HorizontalAlignment="Left" Margin="111,0,0,5.266" Maximum="6" Minimum="1" Name="slidDropSize" VerticalAlignment="Bottom" Width="167.256" ValueChanged="slidDropSize_ValueChanged"/>
        <Label Height="27.953" HorizontalAlignment="Left" Margin="12,0,0,0" Name="label2" VerticalAlignment="Bottom" Width="89">Drop Size</Label>
    </Grid>
</Window>

Here is the Window1.xaml.cs code.  Some things to take note of:

  • We’re no longer setting peaks in the center of the grid, but calling SetRandomPeak to induce each raindrop
  • As before, we’re using the CompositionTarget_Rendering event handler as our main rendering loop.  During the loop, we induce new raindrops, tell the grid to process the point mesh (propagating waves) and we then reattach the new point grid to our MeshGeometry3D
  • Note that we calculate the number of drops to induce by first calculating how many drops we should drop each time we visit this loop (should be moved outside the loop).  We induce points for the integer portion of this number and then use the fractional part as a % chance of dropping one more point.
using System;
using System.Collections.Generic;
using System.Diagnostics;
using System.Linq;
using System.Text;
using System.Windows;
using System.Windows.Controls;
using System.Windows.Data;
using System.Windows.Documents;
using System.Windows.Input;
using System.Windows.Media;
using System.Windows.Media.Media3D;
using System.Windows.Media.Imaging;
using System.Windows.Navigation;
using System.Windows.Shapes;
using System.Windows.Threading;

namespace WaveSim
{
    /// <summary>
    /// Interaction logic for Window1.xaml
    /// </summary>
    public partial class Window1 : Window
    {
        private Vector3D zoomDelta;

        private WaveGrid _grid;
        private bool _rendering;
        private double _lastTimeRendered;
        private Random _rnd = new Random(1234);

        // Raindrop parameters.  Negative amplitude causes little tower of
        // water to jump up vertically in the instant after the drop hits.
        private double _splashAmplitude; // Average height (depth, since negative) of raindrop splashes.
        private double _splashDelta = 1.0;      // Actual splash height is Ampl +/- Delta (random)
        private double _raindropPeriodInMS;
        private double _waveHeight = 15.0;
        private int _dropSize;

        // Values to try:
        //   GridSize=20, RenderPeriod=125
        //   GridSize=50, RenderPeriod=50
        private const int GridSize = 250; //50;
        private const double RenderPeriodInMS = 60; //50;    

        public Window1()
        {
            InitializeComponent();

            _splashAmplitude = -3.0;
            slidPeakHeight.Value = -1.0 * _splashAmplitude;

            _raindropPeriodInMS = 35.0;
            slidNumDrops.Value = 1.0 / (_raindropPeriodInMS / 1000.0);

            _dropSize = 1;
            slidDropSize.Value = _dropSize;

            // Set up the grid
            _grid = new WaveGrid(GridSize);
            meshMain.Positions = _grid.Points;
            meshMain.TriangleIndices = _grid.TriangleIndices;

            // On each WheelMouse change, we zoom in/out a particular % of the original distance
            const double ZoomPctEachWheelChange = 0.02;
            zoomDelta = Vector3D.Multiply(ZoomPctEachWheelChange, camMain.LookDirection);
        }

        private void Window_MouseWheel(object sender, MouseWheelEventArgs e)
        {
            if (e.Delta > 0)
                // Zoom in
                camMain.Position = Point3D.Add(camMain.Position, zoomDelta);
            else
                // Zoom out
                camMain.Position = Point3D.Subtract(camMain.Position, zoomDelta);
        }

        // Start/stop animation
        private void btnStart_Click(object sender, RoutedEventArgs e)
        {
            if (!_rendering)
            {
                //_grid = new WaveGrid(GridSize);        // New grid allows buffer reset
                _grid.FlattenGrid();
                meshMain.Positions = _grid.Points;

                _lastTimeRendered = 0.0;
                CompositionTarget.Rendering += new EventHandler(CompositionTarget_Rendering);
                btnStart.Content = "Stop";
                _rendering = true;
            }
            else
            {
                CompositionTarget.Rendering -= new EventHandler(CompositionTarget_Rendering);
                btnStart.Content = "Start";
                _rendering = false;
            }
        }

        void CompositionTarget_Rendering(object sender, EventArgs e)
        {
            RenderingEventArgs rargs = (RenderingEventArgs)e;
            if ((rargs.RenderingTime.TotalMilliseconds - _lastTimeRendered) > RenderPeriodInMS)
            {
                // Unhook Positions collection from our mesh, for performance
                // (see http://blogs.msdn.com/timothyc/archive/2006/08/31/734308.aspx)
                meshMain.Positions = null;

                // Do the next iteration on the water grid, propagating waves
                double NumDropsThisTime = RenderPeriodInMS / _raindropPeriodInMS;

                // Result at this point for number of drops is something like
                // 2.25.  We'll induce integer portion (e.g. 2 drops), then
                // 25% chance for 3rd drop.
                int NumDrops = (int)NumDropsThisTime;   // trunc
                for (int i = 0; i < NumDrops; i++)
                    _grid.SetRandomPeak(_splashAmplitude, _splashDelta, _dropSize);

                if ((NumDropsThisTime - NumDrops) > 0)
                {
                    double DropChance = NumDropsThisTime - NumDrops;
                    if (_rnd.NextDouble() <= DropChance)
                        _grid.SetRandomPeak(_splashAmplitude, _splashDelta, _dropSize);
                }

                _grid.ProcessWater();

                // Then update our mesh to use new Z values
                meshMain.Positions = _grid.Points;

                _lastTimeRendered = rargs.RenderingTime.TotalMilliseconds;
            }
        }

        private void slidPeakHeight_ValueChanged(object sender, RoutedPropertyChangedEventArgs<double> e)
        {
            // Slider runs [0,30], so our amplitude runs [-30,0].
            // Negative amplitude is desirable because we see little towers of
            // water as each drop bloops in.
            _splashAmplitude = -1.0 * slidPeakHeight.Value;
        }

        private void slidNumDrops_ValueChanged(object sender, RoutedPropertyChangedEventArgs<double> e)
        {
            // Slider runs from [1,1000], with 1000 representing more drops (1 every ms) and
            // 1 representing fewer (1 ever 1000 ms).  This is to make slider seem natural
            // to user.  But we need to invert it, to get actual period (ms)
            _raindropPeriodInMS = (1.0 / slidNumDrops.Value) * 1000.0;
        }

        private void btnWave_Click(object sender, RoutedEventArgs e)
        {
            _grid.InduceWave(_waveHeight);
        }

        private void slidDropSize_ValueChanged(object sender, RoutedPropertyChangedEventArgs<double> e)
        {
            _dropSize = (int)slidDropSize.Value;
        }
    }
}

Finally, here is the updated code for the WaveGrid class.  Things to note:

  • We’ve replaced SetCenterPeak with SetRandomPeak, which does the “dropping”
  • The crazy wave is induced in InduceWave
  • I’ve added a FlattenGrid function, to calm things down

using System;
using System.Collections.Generic;
using System.Diagnostics;
using System.Linq;
using System.Text;
using System.Windows.Media;
using System.Windows.Media.Media3D;

namespace WaveSim
{
class WaveGrid
{
// Constants
const int MinDimension = 5;
const double Damping = 0.96; // SAVE: 0.96
const double SmoothingFactor = 2.0; // Gives more weight to smoothing than to velocity

// Private member data
private Point3DCollection _ptBuffer1;
private Point3DCollection _ptBuffer2;
private Int32Collection _triangleIndices;
private Random _rnd = new Random(48339);

private int _dimension;

// Pointers to which buffers contain:
// – Current: Most recent data
// – Old: Earlier data
// These two pointers will swap, pointing to ptBuffer1/ptBuffer2 as we cycle the buffers
private Point3DCollection _currBuffer;
private Point3DCollection _oldBuffer;

///

/// Construct new grid of a given dimension
///

/// public WaveGrid(int Dimension)
{
if (Dimension < MinDimension) throw new ApplicationException(string.Format("Dimension must be at least {0}", MinDimension.ToString())); _ptBuffer1 = new Point3DCollection(Dimension * Dimension); _ptBuffer2 = new Point3DCollection(Dimension * Dimension); _triangleIndices = new Int32Collection((Dimension - 1) * (Dimension - 1) * 2); _dimension = Dimension; InitializePointsAndTriangles(); _currBuffer = _ptBuffer2; _oldBuffer = _ptBuffer1; } ///

/// Access to underlying grid data
///

public Point3DCollection Points
{
get { return _currBuffer; }
}

///

/// Access to underlying triangle index collection
///

public Int32Collection TriangleIndices
{
get { return _triangleIndices; }
}

///

/// Dimension of grid–same dimension for both X & Y
///

public int Dimension
{
get { return _dimension; }
}

///

/// Induce new disturbance in grid at random location. Height is
/// PeakValue +/- Delta. (Random value in this range)
///

/// Base height of new peak in grid /// Max amount to add/sub from BasePeakValue to get actual value /// # pixels wide, [1,4] public void SetRandomPeak(double BasePeakValue, double Delta, int PeakWidth)
{
if ((PeakWidth < 1) || (PeakWidth > (_dimension / 2)))
throw new ApplicationException(“WaveGrid.SetRandomPeak: PeakWidth param must be <= half the dimension"); int row = (int)(_rnd.NextDouble() * ((double)_dimension - 1.0)); int col = (int)(_rnd.NextDouble() * ((double)_dimension - 1.0)); // When caller specifies 0.0 peak, we assume always 0.0, so don't add delta if (BasePeakValue == 0.0) Delta = 0.0; double PeakValue = BasePeakValue + (_rnd.NextDouble() * 2 * Delta) - Delta; // row/col will be used for top-left corner. But adjust, if that // puts us out of the grid. if ((row + (PeakWidth - 1)) > (_dimension – 1))
row = _dimension – PeakWidth;
if ((col + (PeakWidth – 1)) > (_dimension – 1))
col = _dimension – PeakWidth;

// Change data
for (int ir = row; ir < (row + PeakWidth); ir++) for (int ic = col; ic < (col + PeakWidth); ic++) { Point3D pt = _oldBuffer[(ir * _dimension) + ic]; pt.Y = pt.Y + (int)PeakValue; _oldBuffer[(ir * _dimension) + ic] = pt; } } ///

/// Induce wave along back edge of grid by creating large
/// wall.
///

/// public void InduceWave(double WaveHeight)
{
if (_dimension >= 15)
{
// Just set height of a few rows of points (in middle of grid)
int NumRows = 20;
//double[] SineCoeffs = new double[10] { 0.156, 0.309, 0.454, 0.588, 0.707, 0.809, 0.891, 0.951, 0.988, 1.0 };

Point3D pt;
int StartRow = _dimension / 2;
for (int i = (StartRow – 1) * _dimension; i < (_dimension * (StartRow + NumRows)); i++) { int RowNum = (i / _dimension) + StartRow; pt = _oldBuffer[i]; //pt.Y = pt.Y + (WaveHeight * SineCoeffs[RowNum]); pt.Y = pt.Y + WaveHeight ; _oldBuffer[i] = pt; } } } ///

/// Leave buffers in place, but change notation of which one is most recent
///

private void SwapBuffers()
{
Point3DCollection temp = _currBuffer;
_currBuffer = _oldBuffer;
_oldBuffer = temp;
}

///

/// Clear out points/triangles and regenerates
///

/// private void InitializePointsAndTriangles()
{
_ptBuffer1.Clear();
_ptBuffer2.Clear();
_triangleIndices.Clear();

int nCurrIndex = 0; // March through 1-D arrays

for (int row = 0; row < _dimension; row++) { for (int col = 0; col < _dimension; col++) { // In grid, X/Y values are just row/col numbers _ptBuffer1.Add(new Point3D(col, 0.0, row)); // Completing new square, add 2 triangles if ((row > 0) && (col > 0))
{
// Triangle 1
_triangleIndices.Add(nCurrIndex – _dimension – 1);
_triangleIndices.Add(nCurrIndex);
_triangleIndices.Add(nCurrIndex – _dimension);

// Triangle 2
_triangleIndices.Add(nCurrIndex – _dimension – 1);
_triangleIndices.Add(nCurrIndex – 1);
_triangleIndices.Add(nCurrIndex);
}

nCurrIndex++;
}
}

// 2nd buffer exists only to have 2nd set of Z values
_ptBuffer2 = _ptBuffer1.Clone();
}

///

/// Set height of all points in mesh to 0.0. Also resets buffers to
/// original state.
///

public void FlattenGrid()
{
Point3D pt;

for (int i = 0; i < (_dimension * _dimension); i++) { pt = _ptBuffer1[i]; pt.Y = 0.0; _ptBuffer1[i] = pt; } _ptBuffer2 = _ptBuffer1.Clone(); _currBuffer = _ptBuffer2; _oldBuffer = _ptBuffer1; } ///

/// Determine next state of entire grid, based on previous two states.
/// This will have the effect of propagating ripples outward.
///

public void ProcessWater()
{
// Note that we write into old buffer, which will then become our
// “current” buffer, and current will become old.
// I.e. What starts out in _currBuffer shifts into _oldBuffer and we
// write new data into _currBuffer. But because we just swap pointers,
// we don’t have to actually move data around.

// When calculating data, we don’t generate data for the cells around
// the edge of the grid, because data smoothing looks at all adjacent
// cells. So instead of running [0,n-1], we run [1,n-2].

double velocity; // Rate of change from old to current
double smoothed; // Smoothed by adjacent cells
double newHeight;
int neighbors;

int nPtIndex = 0; // Index that marches through 1-D point array

// Remember that Y value is the height (the value that we’re animating)
for (int row = 0; row < _dimension; row++) { for (int col = 0; col < _dimension; col++) { velocity = -1.0 * _oldBuffer[nPtIndex].Y; // row, col smoothed = 0.0; neighbors = 0; if (row > 0) // row-1, col
{
smoothed += _currBuffer[nPtIndex – _dimension].Y;
neighbors++;
}

if (row < (_dimension - 1)) // row+1, col { smoothed += _currBuffer[nPtIndex + _dimension].Y; neighbors++; } if (col > 0) // row, col-1
{
smoothed += _currBuffer[nPtIndex – 1].Y;
neighbors++;
}

if (col < (_dimension - 1)) // row, col+1 { smoothed += _currBuffer[nPtIndex + 1].Y; neighbors++; } // Will always have at least 2 neighbors smoothed /= (double)neighbors; // New height is combination of smoothing and velocity newHeight = smoothed * SmoothingFactor + velocity; // Damping newHeight = newHeight * Damping; // We write new data to old buffer Point3D pt = _oldBuffer[nPtIndex]; pt.Y = newHeight; // row, col _oldBuffer[nPtIndex] = pt; nPtIndex++; } } SwapBuffers(); } } } [/sourcecode] That’s basically it.  If anyone is interested in getting the source code, leave a comment and I’ll take the trouble to post it somewhere.

Simple Water Animation in WPF

Many years ago (mid-80s), I was working at a company that had a Silicon Graphics workstation.  Among a handful of demos designed to show off the SGI machine’s high-end graphics was a simulation of wave propagation in a little wireframe mesh.  It was great fun to play with by changing the height of points in the mesh and then letting the simulation run.  And the SGI machine was fast enough that the resulting animation was just mesmerizing.

Recreating this water simulation in WPF seemed like a nice way to learn a little more about 3D graphics in WPF.  (The end result is here).

The first step was to find an algorithm that simulates wave propagation through water.  It turns out that there is a very simple algorithm that achieves the desired effect simply by taking the average height of neighboring points.  The basic algorithm is described in detail in this article on 2D Water.  The same algorithm is also described in The Water Effect Explained.

The next step is to set up the 3D viewport and its constituent elements.  I used two different directional lights, to create more contrast on the surface of the water, as well as defining both diffuse and specular material properties for the surface of the water.

Here is the relevant XAML.  Note that meshMain is the mesh that will contain the surface of the water.

        <Viewport3D Name="viewport3D1" Margin="0,8.181,0,0" Grid.Row="1">
            <Viewport3D.Camera>
                <PerspectiveCamera x:Name="camMain" Position="48 7.8 41" LookDirection="-48 -7.8 -41" FarPlaneDistance="100" UpDirection="0,1,0" NearPlaneDistance="1" FieldOfView="70">

                </PerspectiveCamera>
            </Viewport3D.Camera>
            <ModelVisual3D x:Name="vis3DLighting">
                <ModelVisual3D.Content>
                    <DirectionalLight x:Name="dirLightMain" Direction="2, -2, 0"/>
                </ModelVisual3D.Content>
            </ModelVisual3D>
            <ModelVisual3D>
                <ModelVisual3D.Content>
                    <DirectionalLight Direction="0, -2, 2"/>
                </ModelVisual3D.Content>
            </ModelVisual3D>
            <ModelVisual3D>
                <ModelVisual3D.Content>
                    <GeometryModel3D x:Name="gmodMain">
                        <GeometryModel3D.Geometry>
                            <MeshGeometry3D x:Name="meshMain" >
                            </MeshGeometry3D>
                        </GeometryModel3D.Geometry>
                        <GeometryModel3D.Material>
                            <MaterialGroup>
                                <DiffuseMaterial x:Name="matDiffuseMain">
                                    <DiffuseMaterial.Brush>
                                        <SolidColorBrush Color="DarkBlue"/>
                                    </DiffuseMaterial.Brush>
                                </DiffuseMaterial>
                                <SpecularMaterial SpecularPower="24">
                                    <SpecularMaterial.Brush>
                                        <SolidColorBrush Color="LightBlue"/>
                                    </SpecularMaterial.Brush>
                                </SpecularMaterial>
                            </MaterialGroup>
                        </GeometryModel3D.Material>
                    </GeometryModel3D>
                </ModelVisual3D.Content>
            </ModelVisual3D>
        </Viewport3D>

Next, we create a WaveGrid class that implements the basic algorithm described above.  The basic idea is that we maintain two separate buffers of mesh data—one representing the current state of the water and one the prior state.  WaveGrid stores this data in two Point3DCollection objects.  As we run the simulation, we alternate which buffer we’re writing into and attach our MeshGeometry3D.Positions property to the most recent buffer.  Note that we’re only changing the vertical height of the points—which is the Y value.

WaveGrid also builds up the triangle indices for the mesh, in an Int32Collection which will also get connected to our MeshGeometry3D.

All of the interesting stuff happens in ProcessWater.  This is where we implement the smoothing algorithm described in the articles.  Since I wanted to fully animate every point in the mesh, I processed not just the internal points that have four neighboring points, but the points along the edge of the mesh, as well.  As we add in height values of neighboring points, we keep track of how many neighbors we found, so that we can do the averaging properly.

The final value for each point is a function of both the smoothing (average height of your neighbors) and the “velocity”, which is basically—how far from equilibrium was the point during the last iteration?  We also then apply a damping factor, since waves will gradually lose their amplitude.

Here’s the complete code for the WaveGrid class:


using System;
using System.Collections.Generic;
using System.Linq;
using System.Text;
using System.Windows.Media;
using System.Windows.Media.Media3D;

namespace WaveSim
{
    class WaveGrid
    {
        // Constants
        const int MinDimension = 5;    
        const double Damping = 0.96;
        const double SmoothingFactor = 2.0;     // Gives more weight to smoothing than to velocity

        // Private member data
        private Point3DCollection _ptBuffer1;
        private Point3DCollection _ptBuffer2;
        private Int32Collection _triangleIndices;

        private int _dimension;

        // Pointers to which buffers contain:
        //    - Current: Most recent data
        //    - Old: Earlier data
        // These two pointers will swap, pointing to ptBuffer1/ptBuffer2 as we cycle the buffers
        private Point3DCollection _currBuffer;
        private Point3DCollection _oldBuffer;

        /// <summary>
        /// Construct new grid of a given dimension
        /// </summary>
        ///
<param name="Dimension"></param>
        public WaveGrid(int Dimension)
        {
            if (Dimension < MinDimension)
                throw new ApplicationException(string.Format("Dimension must be at least {0}", MinDimension.ToString()));

            _ptBuffer1 = new Point3DCollection(Dimension * Dimension);
            _ptBuffer2 = new Point3DCollection(Dimension * Dimension);
            _triangleIndices = new Int32Collection((Dimension - 1) * (Dimension - 1) * 2);

            _dimension = Dimension;

            InitializePointsAndTriangles();

            _currBuffer = _ptBuffer2;
            _oldBuffer = _ptBuffer1;
        }

        /// <summary>
        /// Access to underlying grid data
        /// </summary>
        public Point3DCollection Points
        {
            get { return _currBuffer; }
        }

        /// <summary>
        /// Access to underlying triangle index collection
        /// </summary>
        public Int32Collection TriangleIndices
        {
            get { return _triangleIndices; }
        }

        /// <summary>
        /// Dimension of grid--same dimension for both X & Y
        /// </summary>
        public int Dimension
        {
            get { return _dimension; }
        }

        /// <summary>
        /// Set center of grid to some peak value (high point).  Leave
        /// rest of grid alone.  Note: If dimension is even, we're not
        /// exactly at the center of the grid--no biggie.
        /// </summary>
        ///
<param name="PeakValue"></param>
        public void SetCenterPeak(double PeakValue)
        {
            int nCenter = (int)_dimension / 2;

            // Change data in oldest buffer, then make newest buffer
            // become oldest by swapping
            Point3D pt = _oldBuffer[(nCenter * _dimension) + nCenter];
            pt.Y = (int)PeakValue;
            _oldBuffer[(nCenter * _dimension) + nCenter] = pt;

            SwapBuffers();
        }

        /// <summary>
        /// Leave buffers in place, but change notation of which one is most recent
        /// </summary>
        private void SwapBuffers()
        {
            Point3DCollection temp = _currBuffer;
            _currBuffer = _oldBuffer;
            _oldBuffer = temp;
        }

        /// <summary>
        /// Clear out points/triangles and regenerates
        /// </summary>
        ///
<param name="grid"></param>
        private void InitializePointsAndTriangles()
        {
            _ptBuffer1.Clear();
            _ptBuffer2.Clear();
            _triangleIndices.Clear();

            int nCurrIndex = 0;     // March through 1-D arrays

            for (int row = 0; row < _dimension; row++)
            {
                for (int col = 0; col < _dimension; col++)
                {
                    // In grid, X/Y values are just row/col numbers
                    _ptBuffer1.Add(new Point3D(col, 0.0, row));

                    // Completing new square, add 2 triangles
                    if ((row > 0) && (col > 0))
                    {
                        // Triangle 1
                        _triangleIndices.Add(nCurrIndex - _dimension - 1);
                        _triangleIndices.Add(nCurrIndex);
                        _triangleIndices.Add(nCurrIndex - _dimension);

                        // Triangle 2
                        _triangleIndices.Add(nCurrIndex - _dimension - 1);
                        _triangleIndices.Add(nCurrIndex - 1);
                        _triangleIndices.Add(nCurrIndex);
                    }

                    nCurrIndex++;
                }
            }

            // 2nd buffer exists only to have 2nd set of Z values
            _ptBuffer2 = _ptBuffer1.Clone();
        }

        /// <summary>
        /// Determine next state of entire grid, based on previous two states.
        /// This will have the effect of propagating ripples outward.
        /// </summary>
        public void ProcessWater()
        {
            // Note that we write into old buffer, which will then become our
            //    "current" buffer, and current will become old. 
            // I.e. What starts out in _currBuffer shifts into _oldBuffer and we
            // write new data into _currBuffer.  But because we just swap pointers,
            // we don't have to actually move data around.

            // When calculating data, we don't generate data for the cells around
            // the edge of the grid, because data smoothing looks at all adjacent
            // cells.  So instead of running [0,n-1], we run [1,n-2].

            double velocity;    // Rate of change from old to current
            double smoothed;    // Smoothed by adjacent cells
            double newHeight;
            int neighbors;

            int nPtIndex = 0;   // Index that marches through 1-D point array

            // Remember that Y value is the height (the value that we're animating)
            for (int row = 0; row < _dimension ; row++)
            {
                for (int col = 0; col < _dimension; col++)
                {
                    velocity = -1.0 * _oldBuffer&#91;nPtIndex&#93;.Y;     // row, col
                    smoothed = 0.0;

                    neighbors = 0;
                    if (row > 0)    // row-1, col
                    {
                        smoothed += _currBuffer[nPtIndex - _dimension].Y;
                        neighbors++;
                    }

                    if (row < (_dimension - 1))   // row+1, col
                    {
                        smoothed += _currBuffer&#91;nPtIndex + _dimension&#93;.Y;
                        neighbors++;
                    }

                    if (col > 0)          // row, col-1
                    {
                        smoothed += _currBuffer[nPtIndex - 1].Y;
                        neighbors++;
                    }

                    if (col < (_dimension - 1))   // row, col+1
                    {
                        smoothed += _currBuffer&#91;nPtIndex + 1&#93;.Y;
                        neighbors++;
                    }

                    // Will always have at least 2 neighbors
                    smoothed /= (double)neighbors;

                    // New height is combination of smoothing and velocity
                    newHeight = smoothed * SmoothingFactor + velocity;

                    // Damping
                    newHeight = newHeight * Damping;

                    // We write new data to old buffer
                    Point3D pt = _oldBuffer&#91;nPtIndex&#93;;
                    pt.Y = newHeight;   // row, col
                    _oldBuffer&#91;nPtIndex&#93; = pt;

                    nPtIndex++;
                }
            }

            SwapBuffers();
        }
    }
}
&#91;/sourcecode&#93;

Finally, we need to hook everything up.  When our main window fires up, we create an instance of <strong>WaveGrid </strong>and set the center point in the grid to some peak value.  When we start the animation, this higher point will fall and trigger the waves.

We do all of the animation in the <strong>CompositionTarget.Rendering </strong>event handler.  This is the recommended spot to do custom animations in WPF, as opposed to doing the animation in some timer Tick event.  (<em>Windows Presentation Foundation Unleashed</em>, Nathan, pg 470).

When you attach a handler to the <strong>Rendering </strong>event, WPF just continues rendering frames indefinitely.  One problem is that the handler will get called for every frame rendered, which turns out to be too fast for our water animation.  To get the water to look right, we keep track of the time that we last rendered a frame and then wait a specified number of milliseconds before rendering another.

Here is the full source code for Window1.xaml.cs:


using System;
using System.Collections.Generic;
using System.Diagnostics;
using System.Linq;
using System.Text;
using System.Windows;
using System.Windows.Controls;
using System.Windows.Data;
using System.Windows.Documents;
using System.Windows.Input;
using System.Windows.Media;
using System.Windows.Media.Media3D;
using System.Windows.Media.Imaging;
using System.Windows.Navigation;
using System.Windows.Shapes;
using System.Windows.Threading;

namespace WaveSim
{
    /// <summary>
    /// Interaction logic for Window1.xaml
    /// </summary>
    public partial class Window1 : Window
    {
        private Vector3D zoomDelta;

        private WaveGrid _grid;
        private bool _rendering;
        private double _lastTimeRendered;
        private double _firstPeak = 6.5;

        // Values to try:
        //   GridSize=20, RenderPeriod=125
        //   GridSize=50, RenderPeriod=50
        private const int GridSize = 50;   
        private const double RenderPeriodInMS = 50;    

        public Window1()
        {
            InitializeComponent();

            _grid = new WaveGrid(GridSize);        // 10x10 grid
            slidPeakHeight.Value = _firstPeak;
            _grid.SetCenterPeak(_firstPeak);
            meshMain.Positions = _grid.Points;
            meshMain.TriangleIndices = _grid.TriangleIndices;

            // On each WheelMouse change, we zoom in/out a particular % of the original distance
            const double ZoomPctEachWheelChange = 0.02;
            zoomDelta = Vector3D.Multiply(ZoomPctEachWheelChange, camMain.LookDirection);
        }

        private void Window_MouseWheel(object sender, MouseWheelEventArgs e)
        {
            if (e.Delta > 0)
                // Zoom in
                camMain.Position = Point3D.Add(camMain.Position, zoomDelta);
            else
                // Zoom out
                camMain.Position = Point3D.Subtract(camMain.Position, zoomDelta);
            Trace.WriteLine(camMain.Position.ToString());
        }

        // Start/stop animation
        private void btnStart_Click(object sender, RoutedEventArgs e)
        {
            if (!_rendering)
            {
                _grid = new WaveGrid(GridSize);        // 10x10 grid
                _grid.SetCenterPeak(_firstPeak);
                meshMain.Positions = _grid.Points;

                _lastTimeRendered = 0.0;
                CompositionTarget.Rendering += new EventHandler(CompositionTarget_Rendering);
                btnStart.Content = "Stop";
                slidPeakHeight.IsEnabled = false;
                _rendering = true;
            }
            else
            {
                CompositionTarget.Rendering -= new EventHandler(CompositionTarget_Rendering);
                btnStart.Content = "Start";
                slidPeakHeight.IsEnabled = true;
                _rendering = false;
            }
        }

        void CompositionTarget_Rendering(object sender, EventArgs e)
        {
            RenderingEventArgs rargs = (RenderingEventArgs)e;
            if ((rargs.RenderingTime.TotalMilliseconds - _lastTimeRendered) > RenderPeriodInMS)
            {
                // Unhook Positions collection from our mesh, for performance
                // (see http://blogs.msdn.com/timothyc/archive/2006/08/31/734308.aspx)
                meshMain.Positions = null;

                // Do the next iteration on the water grid, propagating waves
                _grid.ProcessWater();

                // Then update our mesh to use new Z values
                meshMain.Positions = _grid.Points;

                _lastTimeRendered = rargs.RenderingTime.TotalMilliseconds;
            }
        }

        private void slidPeakHeight_ValueChanged(object sender, RoutedPropertyChangedEventArgs<double> e)
        {
            _firstPeak = slidPeakHeight.Value;
            _grid.SetCenterPeak(_firstPeak);
        }
    }
}

The end result is pretty satisfying—a nice smooth animation of a series of ripples propagating out from the initial disturbance.  You can install and run the simulation by clicking here.  Note that you can zoom in/out using the mouse wheel.

We could extend this example in several different ways:

  • Render the surface of the water in a more lifelike way—e.g. glassy, with reflections.
  • Add simple controls to change the viewpoint or to rotate the mesh itself
  • Add knobs for playing with things like Damping and SmoothingFactor
  • Add ability to “grab” points in the mesh with the mouse and manually move them up/down
  • Raindrop simulation—just add timer that introduces new random peaks, representing raindrops
  • Antialiasing–also consider diagonally adjacent points as neighbors, but adjust by weighting factor when averaging

Drawing a Cube in WPF

It’s time to draw a simple 3D object using WPF.  As a quick introduction to 3D graphics in WPF, let’s just render one of the simplest possible objects—a cube.

In this example, I’ll define everything that we need directly in XAML.  As with everything else in WPF, we could do all this directly in code.  But defining everything in the XAML is a bit cleaner, in that it makes the object hierarchy more obvious.  In a real-world project, you’d obviously do some of this in code, e.g. the creation or loading of the 3D mesh (the object that we want to display).

Let’s start with the final XAML.  Here are the full contents of the Window1.xaml file:

<Window x:Class="SimpleCube.Window1"
    xmlns="http://schemas.microsoft.com/winfx/2006/xaml/presentation"
    xmlns:x="http://schemas.microsoft.com/winfx/2006/xaml"
    Title="Window1" Height="398" Width="608"
    <Grid>
        <Viewport3D Name="viewport3D1">
            <Viewport3D.Camera>
                <PerspectiveCamera x:Name="camMain" Position="6 5 4" LookDirection="-6 -5 -4">
                </PerspectiveCamera>
            </Viewport3D.Camera>
            <ModelVisual3D>
                <ModelVisual3D.Content>
                    <DirectionalLight x:Name="dirLightMain" Direction="-1,-1,-1">
                    </DirectionalLight>
                </ModelVisual3D.Content>
            </ModelVisual3D>
            <ModelVisual3D>
                <ModelVisual3D.Content>
                    <GeometryModel3D>
                        <GeometryModel3D.Geometry>
                            <MeshGeometry3D x:Name="meshMain"
                                Positions="0 0 0  1 0 0  0 1 0  1 1 0  0 0 1  1 0 1  0 1 1  1 1 1"
                                TriangleIndices="2 3 1  2 1 0  7 1 3  7 5 1  6 5 7  6 4 5  6 2 0  2 0 4  2 7 3  2 6 7  0 1 5  0 5 4">
                            </MeshGeometry3D>
                        </GeometryModel3D.Geometry>
                        <GeometryModel3D.Material>
                            <DiffuseMaterial x:Name="matDiffuseMain">
                                <DiffuseMaterial.Brush>
                                    <SolidColorBrush Color="Red"/>
                                </DiffuseMaterial.Brush>
                            </DiffuseMaterial>
                        </GeometryModel3D.Material>
                    </GeometryModel3D>
                </ModelVisual3D.Content>
            </ModelVisual3D>
        </Viewport3D>
    </Grid>
</Window>

The basic idea here is that we need a Viewport3D object that contains everything required to render our cube.  The simplified structure, showing the Viewport3D and its child objects, is:

Viewport3D
    ModelVisual3D   (defines lighting)
        DirectionalLight
    ModelVisual3D   (defines object to render)
        GeometryModel3D
            MeshGeometry3D
            DiffuseMaterial

Here’s what each of these objects is responsible for:

  • Viewport3D – A place to render 3D stuff
  • ModelVisual3D – A 3D object contained by the viewport, either a light or a geometry
  • DirectionalLight – A light shining in a particular direction
  • GeometryModel3D – A 3D geometrical object
  • MeshGeometry3D – The set of triangles that defines a 3D object
  • DiffuseMaterial – Material used to render a 3D object, e.g. a brush

Perhaps the most interesting of these classes is the MeshGeometry3D.  A “mesh” basically consists of a series of triangles, typically all connected to form the 3D object that you want to render.  The MeshGeometry3D object defines a mesh by specifying a series of points and then a collection of triangles.  The collection of points represent all of the vertexes in the mesh and are defined by the Positions property.  The triangles, stored in the TriangleIndices property, are defined in terms of the points, using indexes into the Positions collection.

This seems a bit odd at first.  Why not just define a collection of triangles, each consisting of three points?  Why define the points as a separate collection and then define the triangles by referencing the points?  The answer is that this scheme allows reusing a single point in multiple triangles.

In our case, drawing a cube, we define eight points, for the eight vertexes of the cube.  The image below shows the points numbered from 0-7, matching the order that we add them to Positions.  The back left corner of the cube is located at (0, 0, 0).

After defining the points, we define the 12 triangles that make up the surface cube—two triangles per face.  We define each triangle by just listing the indexes of the three points that make up the triangle.

It’s also important to pay attention to the order that we list the indexes for each triangle.  The order dictates the direction of a vector normal to the triangle, which indicates which side of the triangle that we can see.  The rule is: add vertexes counter-clockwise, as you look at the visible face of the triangle.

In addition to the mesh, we define a material used to render the cube.  In this case, it’s a DiffuseMaterial, which allows painting the surface of the cube with a simple brush.

We also need to add a camera to our scene, by specifying where it is located and what direction it looks in.  In order to see our cube, we put the camera at (6, 5, 4) and then set its LookDirection, a vector, to (-6, -5, -4) so that it looks back towards the origin.

Finally, in order to see the cube, we need lighting.  We define a single light source, which is a DirectionalLight—a light that has no position, but just casts light in a particular direction.

The final result is a simple red cube.