All right, it’s time to create our first “hello world” application in WPF. Let’s just use the Visual Studio wizard to create an application and then poke around to see what we got. (Yes, I know I’m a bit late to the WPF game, but let’s just get started).
We’ll start by doing a New Project in Visual Studio 2008. Under Visual C# (I’m a C# guy), select Windows to see projects related to thick clients. If you change the targeted .NET Framework to version 3.0 or 3.5, you’ll see the following WPF project types:
- WPF Application
- WPF Browser Application
- WPF Custom Control Library
- WPF User Control Library

This seems pretty straightforward. We’re building an application, rather than a control library. So we want to create a WPF Application. I’ll explore creating WPF controls later.
Now it’s time to see what the project wizard created for us in our project. As we walk through the solution, let’s compare the pieces with an equivalent “hello world” application in Win Forms, just to see how WPF differs.

AssemblyInfo.cs
For starters, both projects have an AssemblyInfo.cs file that describes metadata for the assembly. Cracking them open, they’re pretty similar, as expected. But there are a couple of differences.
The WPF project includes a couple additional namespaces—System.Resources and System.Windows. System.Resources is added for the NeutralResourcesLanguage attribute.
System.Windows is, surprisingly, a new namespace for WPF, containing a lot the high-level WPF classes and types. In this case, we’re using the ThemeInfo attribute and the ResourceDictionaryLocation enumeration.

The first new chunk of stuff in the WPF file is a commented out instance of the NeutralResourcesLanguage attribute and a comment about adding an <UICulture> tag to your project, if you want your application localizable. Adding the <UICulture> tag to your project file will tell the project that it should be localizable, and causes creation of the external satellite DLL. We’re also instructed to uncomment the NeutralResourcesLanguage attribute, and setting the culture to match the <UICulture> tag—which indicates what our “neutral” language is, i.e. the native language of the assembly itself. This reportedly speeds performance during the resource fallback process—runtime won’t bother looking for an external resource DLL if the thread’s CurrentUICulture matches the neutral culture of your assembly. A little unclear why the attribute is required—possibly just to make sure you set the neutral culture to match the <UICulture> tag.

Next, the WPF AssemblyInfo.cs file contains an instance of the ThemeInfo attribute. This attribute has to do with defining theme-specific resources for your controls—i.e. you define a set of resources that applies a style to your controls, depending on which Windows theme is active. Looks like a topic for a future post.
Resources.resx & Resources.Designer.cs
The default resources file created by the project wizard is the same for a WPF application as for a Win Forms application. We get an empty resource file and an internal class that will be used to contain strong-typed string resources. (The strongly typed resources were new in VS2005 and offer the huge benefit of being told at compile time that you misspelled a resource name, rather than just having the resource not be found at run time).
Settings.settings & Settings.Designer.cs
The default settings file in WPF is the same as the Win Forms file, with one subtle difference. The WPF version uses an XML namespace of “uri:settings”, rather than the Win Forms explicit namespace, which is “http://schemas.microsoft.com/VisualStudio/2004/01/settings”. I’m not enough of an XML or a URI/URN guru to understand the difference here, other than observing that the WPF version is more generic. It’s also interesting to see that using “uri” for the URI scheme (the part before the colon) is not an official IANA-registered usage. (See http://en.wikipedia.org/wiki/URI_scheme).
Assembly References
The WPF project references three new assemblies for WPF : PresentationCore, PresentationFramework, and WindowsBase. These just contain new WPF types, sprinkled across many different namespaces. (By the way, if you’re curious about the total # types in the Framework, take a look at this post by Brad Abrams: http://blogs.msdn.com/brada/archive/2008/03/17/number-of-types-in-the-net-framework.aspx).
Out of curiosity, I ran NDepend on these WPF assemblies and came up with the following metrics. PresentationCore – 2,711 types, PresentationFramework – 2,306, and WindowsBase – 785. And these are just a subset of the assemblies introduced for WPF in .NET 3.0!
The WPF project does not reference the System.Deployment, System.Drawing or System.Windows.Forms assemblies. System.Drawing and System.Windows.Forms include GDI+ and Windows Forms functionality, respectively, so it’s obvious why we no longer need them in WPF. System.Deployment is related to deploying with ClickOnce and it’s not clear why the Win Forms project included it by default.
App.xaml vs. Program.cs
Now we come to the core differences between a Win Forms and a WPF application. In terms of what you see in the WPF project, the App class couldn’t be simpler—an empty partial class deriving from System.Windows.Application and a mostly empty XAML file:

App.xaml.cs
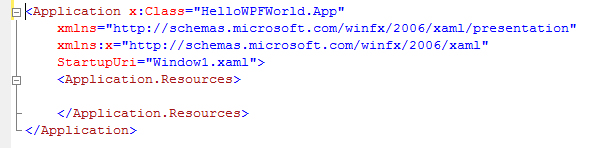
App.xaml
Wait a minute! Where’s my Main() function? In the wizard-generated Win Forms project, we got a Program.cs file with a Main(), which called System.Windows.Forms.Application.Run, passing it an instance of our main form. But how does the WPF application start itself up?
The hint is that our App class is declared as a partial class. If we right-click on the App class and select Go To Definition, we can hunt down the file App.g.i.cs (in the \Debug or \Release folder, if we’ve built our application). You can also click Show All Files in the Solution Explorer and expand the obj\Debug folder, finding App.g.cs. (These files appear to be identical—perhaps the i.cs file is generated by Intellisense)?
The magic that creates these generated files at build time comes from the <Generator>MSBuild:Compile</Generator> line in our .csproj file, for the App.xaml file (under ApplicationDefinition tag). When App.xaml is built, MSBuild generates the actual code that represents what was declared in App.xaml, storing the code in App.g.cs. The actual code generation magic happens in the Microsoft.Build.Tasks.Windows namespace, which lives in the PresentationBuildTasks assembly. Sounds like another topic for a future blog. (I started to get lost in Ildasm).
Now let’s take a look at the App.g.cs file. It shows that we’re deriving from System.Windows.Application, which is the main WPF application class. We also see that the InitializeComponent method is pulling stuff in from the XAML file. In our case, all we have in App.xaml is a value for the StartupUri attribute, which pointed to the XAML file for our main window. In our code, this maps to setting the StartupUri property of the Application class. This is basically just—the UI that should be shown when our application starts.

App.g.cs
The Main function is very similar to what we find in Program.cs for our Win Forms application—we just create an instance of our App class, call InitializeComponent to set stuff up, and call the Application.Run method. It should be no surprise that the documentation for Run tells us that it creates a System.Windows.Threading.Dispatcher object, which creates a message pump to process windows messages.
Note that we could also call Run and pass it a Window object to indicate the first window to open when the application starts. Instead, the generated code specifies the first window by setting the StartupUri property.
Next time: Looking at the Window1.xaml, Window1.xaml.cs and Window1.g.cs files, which define the application’s main window.

Pingback: Hello Silverlight World, part 1 - Generating the Project « Sean’s Stuff
Your description is very helpful about the comparison of App.g.i.cs & Program.cs.
But what is the purpose for having App.xaml and App.xaml.cs files..?
Please make a reply
Gayan,
Are you asking why we go through the trouble of authoring App.xaml, if we just end up generating code (App.xaml.cs) based on the markup? Notice how much simpler it is to author something declaratively, by creating the .xaml file, rather than writing code. In our case, we are really only specifying the startup URI (the window), so App.xaml is quite simple. But notice how much more complicated the App.g.cs file is–there is a lot more going on at runtime, in the code. So it’s nice to let the code generator generate all this “boilerplate” stuff for us.
Also note that our App class, as declared in App.g.cs and App.xaml.cs, is a partial class. This allows us to define a portion of the code for the class (in App.xaml.cs) and the code generator to define the rest of it (in App.g.cs). We do want App.xaml.cs, because this is where we’d put any application-level custom code. (You could write utility functions here, or override methods of the parent Application class). So App.xaml.cs is just the place to put your code for the App object. And App.xaml is the place to declare things like application-level resources.
I’m working a project to take a custom file format in XML syntax for reporting and we need to generate boiler plate code similar which would be traditionally done with a SingleFileGenerator to produce a .Designer.cs file. However, I’ve grown to like the code generation model used with .XAML files in WPF as you describe here and would like to use this same technique to auto generate our boiler plate code and place it into a MyReport.g.cs file as is done with WPF. Is this possible? where do I start?
I’ve been playing around with VS Addins and SingleFileGenerators and now I would like to find out if I can leverge this technique to reduce the amount of redundant .Designer.cs types of code files in our project.
How much time did it require you to write “Hello
WPF World, part 1 � Sean�s Stuff”? It contains an awful lot of really
good knowledge. Appreciate it -Dixie
Thanks Dixie. Not long to write, it’s pretty basic stuff.