Let’s continue poking around with a first WPF “hello world” application. We’ll continue comparing our bare bones wizard-generated WPF project with an equivalent Win Forms application. And we’ll look at how XAML fits into our application architecture.
Last time, we compared the Win Forms Program class with its parallel in WPF–an App class, which inherits from System.Windows.Application. The application framework in Win Forms was pretty lightweight–we just had a simple class that instantiated a form and called the Application.Run method. WPF was just a bit more complicated. If we count the generated code, we have an App class split across a couple of files, as well as a .xaml file that defines applicaton-level properties (like the startup window).
Now let’s compare the main form in our Win Forms application with the main window generated for us in WPF. (The fact that WPF calls it a window, rather than a form, hints at the idea that GUI windows aren’t meant to be used just for entering data in business applications).
In Windows Forms, we have two files for each form–the form containing designer-generated code (e.g. Form1.Designer.cs) and the main code file where a user adds their own code (e.g. Form1.cs). These two source files completely define the form and are all that’s required to build and run your application. In Windows Forms, the designer renders a form in the IDE simply by reading the Form1.Designer.cs file and reconstructing the layout of the form directly from the code. (The IDE does create a Form1.resx resource file, but by default your form is not localizable and the resource file contains nothing).
When you think about it, this approach is a bit kludgy. The designer is inferring the form’s layout and control properties by parsing the code and reconstructing the form. Form1.Designer.cs is meant to contain only designer-generated code, so with partial classes, we can keep designer-generated code in a single file and it only contains designer code. But it’s clumsy to use procedural code to define the static layout of a form.
Here’s a picture of how things work in Win Forms:

In this model, the Form1.Designer.cs file contains all the procedural code that is required to render the GUI at runtime–instantiation of controls and setting their properties. We could dispense with the designer in Visual Studio—it’s just a convenient tool for generating the code. (I’m ashamed to admit that I’ve worked on projects that broke the designer and everyone worked from that point on only in the code–ugh)!
Now let’s look at WPF. Here’s a picture of what’s going on:

Note the main difference here is–our designer works with XAML, rather than working with the code. This is the big benefit of using XAML–that the tools can work from a declarative specification of the GUI, rather than having to parse generated code. This also means that it’s easier to allow other tools to work with the same file–e.g. Expression Blend, or XamlPad.
Then at build time, instead of just compiling our source code, the build system first generates source code from the XAML file and then compiles the source code.
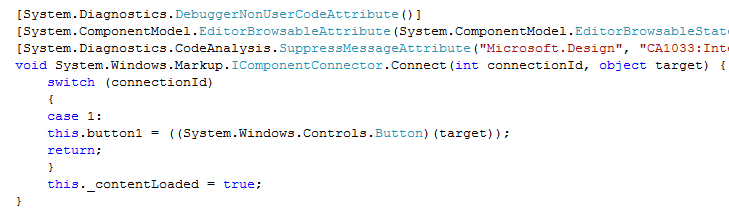
But this isn’t quite the whole story. It’s not the case in WPF that the Window1.g.cs file contains everything required to render the GUI at runtime. If we look at the Window1.g.cs file, we don’t find the familiar lines where we are setting control properties. Instead, we see a call to Application.LoadComponent, where we pass in a path to the .xaml file. We also find a very interesting method called Windows.Markup.IComponentConnector.Connect(), which appears to be getting objects passed into it and then wiring them up to private member variables declared for each control. If we add a single button to our main window, the code looks something like:
But then the obvious question is–what happened to all those control properties? Where do the property values come from at runtime?
Enter BAML–a binary version of the original XAML that is included with our assembly. Let’s modify the above picture to more accurately reflect what is going on:

Note the addition–when we build our project, the contents of the XAML file–i.e. a complete definition of the entire GUI–is compiled into a BAML file and stored in our assembly. Then, at runtime, our code in Window1.g.cs simply loads up the various GUI elements (the logical tree) from the embedded BAML file. This is done by the Connect method that we saw earlier, in conjunction with a call to Application.LoadComponent:

MSDN documentation tells us, for LoadComponent, that it “loads a XAML file that is located at the specified uniform resource identifier (URI) and converts it to an instance of the object that is specified by the root element of the XAML file”. When we look at the root element of the XAML file for our application, we discover that it is an object of type Window, with the specific class being HelloWPFWorld.Window1. Voila! So we now see that the code in Window1.g.cs which was generated at build time just contains an InitializeComponent method whose purpose it is to reconstitute a Window and all its constitutent controls from the GUI definition in the XAML file. (Which went along for the ride with the assembly as compiled BAML).
So what is BAML and where is it? BAML (Binary Application Markup Language) is nothing more than a compiled version of the corresponding XAML. It’s not procedural code of any sort–it’s just a more compact version of XAML. The purpose is just to improve runtime performance–the XAML is parsed/compiled at build time into BAML, so that it does not have to be parsed at runtime when loading up the logical tree.
Where does this chunk of BAML live? If you take a look at our final .exe file in ILDASM, you’ll see it in the manifest as HelloWPFWorld.g.resources. Going a tiny bit deeper, the Reflector tool shows us that HelloWPFWorld.g.resources contains something called window1.baml, which is of type System.IO.MemoryStream. (I found something that indicated there was also a BAML decompiler available from the author of Reflector, which would allow you to extract the .baml from an assembly and decompile back to .xaml–but I couldn’t find the tool when I went looking for it).
So there you have it. We haven’t quite yet finished our “hello world” application, but we’re close. We’ve now looked in more depth at the structure of the application and learned a bit about where XAML fits into the picture. Next time, we’ll add a few controls to the form and talk about how things are rendered.

Excellent intro to WPF apps. I am learning WPF and really appreciate this kind of detail and effort put into a ‘lesson’ on WPF.
Thanks!
Larry
Pingback: Hello Silverlight World, part 3 - The Lifecycle of a Silverlight Control « Sean’s Stuff
Pingback: How can I use NAnt to compile WPF controls | XL-UAT