Windows Backup Products, part 2 – Imaging, Synchronization, Online

Last time I posted a list of the most popular file/folder backup tools.  This time, I’ll look at Windows backup tools that fall into the categories: drive imaging, file/folder synchronization, and online storage.

NOTE: This post is just a survey of available tools, rather than a review.  I’ve used some, but not all, of the tools listed.

Backing up your files and folders should be just a part of your overall backup strategy, but not the entire strategy.  A complete approach would likely include some use of full system backups (imaging), as well as synchronization and online backups.

The tools that I mentioned last time are good for:

  • Automating your backups
  • Getting your files backed up to another PC, via network device
  • Backing files up efficiently, by doing a combination of full/incremental backups
  • Creating “snapshots” of files at a specific point in time

What these traditional tools are not necessarily as good at doing is:

  • Getting your files backed up to an off-site location
  • Sharing files/folders with other devices
  • Allowing you to browse files in original directory structure
  • Backing up your Windows system files
  • Backing up and restoring an entire PC

The tools in these other categories (imaging, synchronization, and online backup) address some of the shortcomings of traditional file/folder backup tools.

Drive Imaging Tools

In addition to periodically backing up your data files, you should consider doing a full disk backup, or image backup.  Traditional file/folder backup tools typically don’t support backing up an entire disk or partition.

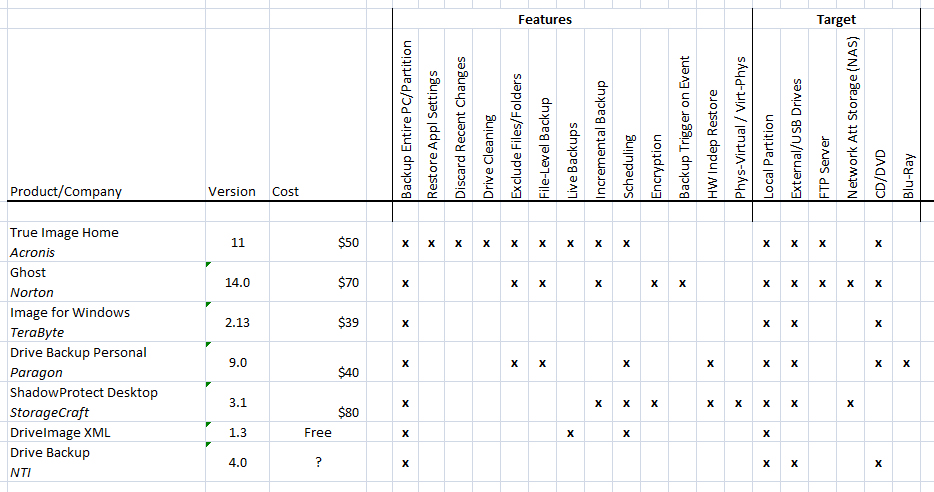
For drive imaging software, I took a brief look at the following products:

These products are all very similar, but there are a few differences.  My list of available features is based on the documentation on each product’s web site.

Drive Imaging Tools

Drive Imaging Tools

Synchronization Tools

The goal of synchronization tools isn’t to create a backup of a directory, but to create a copy of that directory on other devices.  Typically, one PC shares one or more directories, making them visible to the tool or service.  Other devices subscribe to the shared folder and then  replicate the contents locally.

What makes synchronization tools so powerful is their ability to do continuous/live updates.  When someone changes a file in a shared folder, that change is replicated across all of the subscribing PCs immediately.

This gives us the benefits of both shared network drives and remote backups—users on other machines have access to the data at all times and can edit it from their machine.  And the data is also backed up, in that it’s stored in multiple locations.

Desirable features to look for in file synchronization tools include things like:

  • Continuous Updates:  no need to synch manually
  • Multiple Subscribers:  synchronize across multiple devices
  • 2-Way Synchronization:  users can change files in any location
  • Share Across HTTP:  PCs don’t need to be on LAN, but can share via Internet
  • Encryption:  data transferred via HTTP in secure manner
  • Backup to Cloud:  store copy of synched files online

The chart below includes the following synchronization tools and a list of features:

Synchronization Tools

Synchronization Tools

Traditional synchronization tools worked only with devices that were directly networked on a LAN.  But modern synchronization tools are more commonly delivered as a web-based services that synchronize machines via HTTP.  A PC shares a folder to the service, causing the files to get replicated in “the cloud”.  And then other devices can in turn sync to the same folder, allowing the files to get downloaded to the subscribing device.

This “cloud” approach allows doing online backups in addition to synchronizing files across devices.  This is a nice blending of traditional synchronization tools with online backup tools.

Microsoft’s new LiveMesh platform offers maybe the best combination of features spanning both synchronization and online backup.  For each folder added to the mesh, the user can choose exactly which devices to synch the contents to—including both physical devices in the mesh, as well as the online storage area.  This allows doing peer-to-peer synchronization for some data, and online backup for other data.

There are many more network-only synchronization tools available than I list in this chart.  Given the power of the newer tools that also provide online backup, these older tools are becoming less popular.

Online Backup Tools / Services

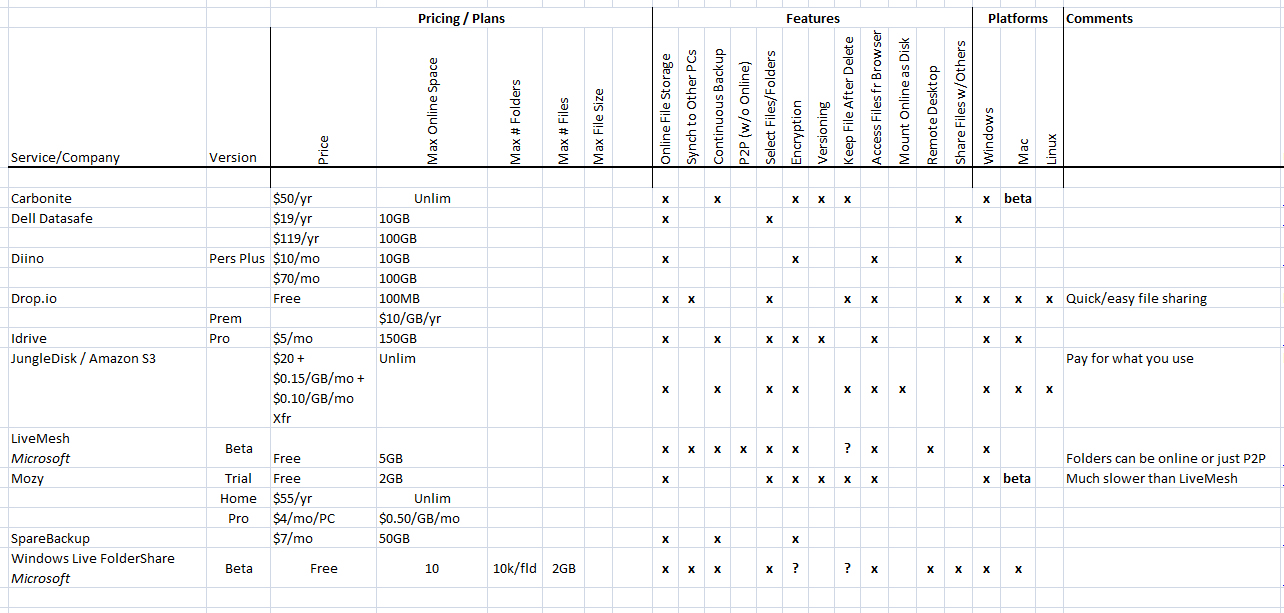
There are also services that offer pure online backup of data, rather than both synchronization and backup.  The chart below lists some of the more common ones, including:

Online Backup Services

Online Backup Services

With easy access to highspeed Internet access these days, it’s clear that online backup, rather than network-only backup, is the preferred choice for most people.  And with storage prices continuing to drop, these services are becoming affordable, even for storing huge amounts of data, like photos & videos.

The future for these products is likely something like the LiveMesh model.  This approach (once LiveMesh provides larger amounts of online storage) is:

  • Continuous online backups
  • Automatic synchronizing of data to multiple devices
  • Ability to do both synchronizing (exact mirrors) and archival (backup at a point in time)

Next Time

At the moment, I’m personally using a combination of LiveMesh and JungleDisk for my backups.  Next time, I’ll describe how I use these tools.

Windows Backup Products, part 1 – File/Folder Backup Tools

Here is a quick summary of the most popular backup tools for Windows.  In general, there are several different flavors/families of backup tools:

  • Traditional file/folder backup tools
  • File/directory synchronization tools
  • Drive imaging tools
  • Online backup tools/services

In this post, I’m focusing on just the first group—traditional tools that let you select a group of files or folders to backup, set up an automated schedule, and then regularly back your files up to a local or network drive.

This list is by no means complete.  I’m focusing here only on tools for Windows and looking only at the more popular commercial tools.  There are, obviously, lots of open source and freeware tools out there and some of them have feature sets that approach some of the commercial tools.

I looked only at tools targeted at home users, rather than the higher-end server-based backup tools, or tools targeted at the enterprise.

My goal here is to just give people a quick list of some of the tools and do a high-level feature-for-feature comparison.

Here are the tools that I include in the chart:

Several of these products offer one or more editions, with different pricing and feature sets.  Where this is the case, I’m only listing the “professional” edition, or the one with the most features (and highest price).

Here is the feature list for these backup tools.  My understanding of which features are provided comes from the product documentation or web site.  (Apologies that this is just an image, rather than formatted as a table in HTML):

Backing up individual files or folders is obviously just one prong of a complete backup strategy.  An important part of the strategy is also in determining where to back your files to—a second or external drive, network drive, or FTP server.  Backing up file sets, though not sufficient for a complete backup strategy, is a good place to start.

If you have a favorite full-featured commercial backup tool that I’ve missed, please feel free to share it in the comments section.

Next Time

Next time, I’ll finish the backup tool survey by talking about directory synchronization tools, drive/PC imaging tools and online backup services.

Why You Need a Backup Plan

Everyone has a backup plan.  Whether you have one that you follow carefully or whether you’ve never even thought about backups, you have a plan in place.  Whatever you are doing or not doing constitutes your backup plan.

I would propose that the three most common backup plans that people follow are:

  1. Remain completely ignorant of the need to back up files
  2. Vaguely know that you should back up your PC, but not really understand what this means
  3. Fully realize the dangers of going without backups and do occasional manual backups, but procrastinate coming up with a plan to do it regularly

Plan #1 is most commonly practiced by less technical folk—i.e. your parents, your brother-in-law, or your local pizza place.  These people can hardly be faulted.  The computer has always remembered everything that they’ve told it, so how could it actually lose something?  (Your pizza guy was unpleasantly reminded of this when his browser informed his wife that the “Tomato Sauce Babes” site was one of his favorite sites).  When these people lose something, they become angry and will likely never trust computers again.

Plan #2 is followed by people who used to follow plan #1, but graduated to plan #2 after accidentally deleting an important file and then blindly trying various things they didn’t understand—including emptying their Recycle Bin.  They now understand that bad things can happen.  (You can also qualify for advancement from plan #1 to #2 if you’ve ever done the following—spent hours editing a document, closed it without first saving, and then clicked No when asked “Do you want to save changes to your document”)?  Although this group understands the dangers of losing stuff, they don’t really know what they can do to protect their data.

Plan #3 is what most of us techies have used for many years.  We do occasional full backups of our system and we may even configure a backup tool to do regular automated backups to a network drive.  But we quickly become complacent and forget to check to see if the backups are still getting done.  Or we forget to add newly created directories to our backup configuration.  How many of us are confident that we have regular backups occurring until the day that we need to restore a file and discover nothing but a one line .log file in our backup directory that simply says “directory not found”?

Shame on us.  If we’ve been working in software development or IT for any length of time, bad things definitely have happened to us.  So we should know better.

Here’s a little test.  When you’re working in Microsoft Word, how often do you press Ctrl-S?  Only after you’ve been slaving away for two hours, writing the killer memo?  Or do you save after every paragraph (or sentence)?  Most of us have suffered one of those “holy f**k” moments at some point in our career.  And now we do know better.

How to Lose Your Data

There are lots of different ways to lose data.  Most of us know to “save early and often” when working on a document because we know that we can’t back up what’s not even on the disk.  But when it comes to actual disk crashes (or worse), we become complacent.  This is certainly true for me.  I had a hard disk crash in 1997 and lost some things that were important to me.  For the next few months, I did regular backups like some sort of data protection zealot.  But I haven’t had a true crash since then—and my backup habits have gradually deteriorated, as I slowly regained my confidence in the reliability of my hard drives.

After all, I’ve read that typical hard drives have an MTBF (Mean Time Between Failures) of 1,000,000 hours.  That works out to 114 years, so I should be okay, right?

No.  MTBF numbers for drives don’t mean that your hard drive is guaranteed (or even expected) to run for many years before encountering an error.  Your MTBF number might be 30 years, but if the service life of your drive is only five years, then you can expect failures on your drive to start becoming more frequent after five years.  The 30 year MTBF means that, statistically, if you were running six drives for that five year period, one of the drives would see a failure at the end of the five years.  In other words, you saw a failure after 30 drive-years—spread across all six drives.  If we were running 30 drives at the same time, we’d expect our first failure on one of those drives after the first year.  (Click here for more  information on MTBF).

In point of fact, your drive might fail the first year.  Or the first day.

And hard drive crashes aren’t the only, or even the most common, type of data loss.  A recent PC World story refers to a study saying that over 300,000 laptops are lost each year from major U.S. airports and not reclaimed.  What about power outages?  Applications that crash and corrupt the file that they were working with?  (Excel did this to me once).  Flood/fire/earthquake?  Or just plain stupidity?  (Delete is right next to Rename in the Windows Explorer context menu).

A Good Backup Plan

So we’re back to where we started.  You definitely need a backup plan.  And you need something better than the default plans listed above.

You need a backup plan that:

  • Runs automatically, without your having to remember to do something
  • Runs often enough to protect data that changes frequently
  • Copies things not just off-disk, or off-computer, but off-site
  • Allows restoring lost data in a reasonably straightforward manner
  • Secures your data, as well as backing it up (when appropriate)
  • Allows access to old data even after you’ve intentionally deleted it from your PC
  • Refreshes backed data regularly, or stores the data on media that will last a long time

The most important attribute of a good backup plan, by far, is that it is automated.  When I was in college, I used to do weekly backups of my entire PC to a stack of floppies, and then haul the floppies to my parents’ house when I’d visit on Sunday.  But when the last few weeks of the semester rolled around, I was typically so busy with papers and cramming that I didn’t have time to babysit a stack of floppies while doing backups.  So I’d skip doing them for a few weeks—at the same time that I was creating a lot of important new school-related data.

How often should your data get backed up?  The answer is–more frequently than the amount of time that you would not want to have to spend reproducing the data.  Reentering a day’s worth of data into Quicken isn’t too painful.  But reentering a full month’s worth probably is—so nightly backups make sense if you use Quicken every day.  On the other hand, when I’m working on some important document that I’ve spent hours editing, I typically back the file up several times an hour.  Losing 10-15 minutes’ worth of work is my pain point.

Off-site backups are important, but often overlooked.  The more destructive the type of data loss, the farther away from the original the backup should be, to keep it safe.  For an accidental fat-finger deletion, a copy in a different directory is sufficient.  Hard drive crash?  The file should be on a different drive.  PC hit by a voltage spike?  The file should be on a different machine.  Fire or flood?  You’d better have a copy at another location if you want to be able to restore it.  The exercise is this—imagine all the bad things that might happen to your data and then decide where to put the data to keep it safe.  If you live in San Francisco and you’re planning for the Big One of ’09, then don’t just store your backups at a buddy’s house down the street.  Send the data to a family member in Chicago.

If you do lose data, you ought to be able to quickly: a) find the data that you lost and b) get that data back again.  If you do full backups once a year to some arcane tape format and then do daily incremental backups, also to tape, how long will it take you to find and restore a clean copy of a single corrupted file?  How long will it take you to completely restore an entire drive that went bad?  Pay attention to the format of your backups and the processes and tools needed to get at your archives.  It should be very easy to find and restore something when you need it.

How concerned are you with the idea of someone else gaining access to your data?  When it comes to privacy, all data is not created equal.  You likely wouldn’t care much if someone got a hold of your Mario Kart high scores.  (In fact, some of you are apparently geeky enough to have already published them).  On the other hand, you wouldn’t be too happy if someone got a copy of that text file where you store your credit card numbers and bank passwords.  No matter how much you trust the tool vendor or service that you’re using for backups, you ought to encrypt any data that you wouldn’t want handed out at a local biker bar.  Actually, this data should already be encrypted on your PC anyway—no matter how physically secure you think your PC is.

We might be tempted to think that the ideal backup plan would be to somehow have all of your data continuously replicated on a system located somewhere else.  Whenever you create or change a file, the changes would be instantly replicated on the other system.  Now you have a perfect replica of all your work, at another location, all of the time.  The problem with this approach is that if you delete a file or directory and then later decide that you wanted it back, it’s too late.  The file will have already been deleted from your backup server.  So, while mirroring data is a good strategy in some cases, you should also have a way to take snapshots of your data and then to leave the snapshots untouched.  (Take a look at the Wayback Machine at the Internet Archive for an example of data archival).

On the other hand, you don’t want to just archive data off to some medium and then never touch it again, expecting the media to last forever.  If you moved precious family photos off of your hard disk and burned them to CDs, do you expect the data on the CDs to be there forever?  Are you figuring that you’ll pass the stack of CDs on to your kids?  A lot has been written about media longevity, but I’ve read that cheaply burned CDs and DVDs may last no longer than 12-24 months.  You need a plan that re-archives your data periodically, to new media or even new types of media.  And ideally, you are archiving multiple copies of everything to protect against problems with the media itself.

How Important Is This?

The critical question to ask yourself is–how precious is my data to me?  Your answer will guide you in coming up with a backup plan that is as failsafe as you need it to be.  Your most important data deserves to be obsessed over.  You probably have thousands of family photos that exist only digitally.  They should be backed up often, in multiple formats, to multiple locations.  One of the best ways to protect data from loss is to disseminate it as widely as possible.  So maybe in addition to multiple backups, your best bet is to print physical copies of these photos and send boxes of photos to family members in several different states.

The bottom line is that you need a backup plan that you’ve come up with deliberately and one that you are following all of the time.  Your data is too important to trust to chance, or to a plan that depends on your remembering to do backups from time to time.  A deliberate plan, coupled with a healthy amount of paranoia, is the best way to keep your data safe.

Next Time

In my next post, I’ll put together a list of various products and services that can help you with backups.  And I’ll share my own backup plan (imperfect as it is).

Hello WPF World, part 3 – Forms and Windows

We continue with our basic “hello world” WPF application by adding a button to our main window and then building and running the application.  We also talk about the difference between forms in Windows Forms and windows in WPF, as well as how to add event handlers.

I want to insert a caveat at this point.  These first few “hello world” posts are basic—very, very basic.  Adding a button to a form and having it display a message box is what most of us do in the first five minutes that we spend playing with a new language or framework.  So don’t expect any cosmic secrets here.  I just want to take a little time to throw together a super simple application and then comment a little bit on what I’m seeing.

Form vs. Window

Let’s start by just building our basic wizard-generated application and then running it.  I’ll continue doing parallel stuff in a Windows Forms application, so we can compare the two.  Here’s what we get when we run the applications:

Form vs. Window

Form vs. Window

Nothing too earth-shattering here, although WPF has gotten rid of two old standbys that I’m sick of—the little multi-colored default application icon and the battleship grey form background.  Good riddance to both of them.

In both cases, we get a simple window with the standard window decoration elements.  Nothing appears to have changed here.  But if we look at the type that implements the window in either case, we see that everything is different under the covers.

Win Forms is using a System.Windows.Forms.Form (System.Windows.Forms.dll), while WPF’s main window is a Systems.Windows.Window (PresentationFramework.dll).

I’m curious, so let’s compare the two classes briefly.  (If you don’t already know about it, now is a good time to teach yourself Ctrl-Alt-J in Visual Studio for popping up the Object Browser).

The inheritance tree for a Win Forms Form is:

And the inheritance tree on the WPF side, for the Window, is:

(I included MSDN’s basic description of each class).  We won’t go any deeper than this for now, but the point is that, for WPF, things are very different under the hood.

One difference to note is that WPF does not support MDI (Multiple Document Interface), whereas Windows Forms does.  I could see a case for continuing to support MDI functionality for those who need it, but I can also see why it’s not worth carrying the old MDI framework forward.  It’s rare to see applications that support MDI in exactly the way that Win Forms supported it (windows entirely contained within parent window, etc).  When you do see a parent window containing child windows, the visual interface is likely different from the traditional sizable child windows—e.g. using a series of tabs.  There are so many different ways of doing this that it’s just easier to roll your own mechanism.  Or perhaps we could get some support in WPF in the future for a more updated and customizable implementation of MDI.

Another good way to see what goes on behind the scenes for the main form/window classes is to look at their lifecycle, as described by the events that the classes fire.  I always end up wanting to keep these “window lifetime” event lists for reference purposes, so they’re worth jotting down here.

Forms.Form events (Win Forms)

Loading/opening new form (application startup), events fired are:

Move
LocationChanged
StyleChanged
BindingContextChanged
Load
Layout
VisibleChanged
Activated
Shown
Paint

Closing a Win Forms Form, the events that fire are:

FormClosing
FormClosed
Deactivate

Windows.Window events (WPF)

Loading/opening new window (application startup), events fired are:

Initialized
IsVisibleChanged
SizeChanged
LayoutUpdated
SourceInitialized
Activated
PreviewGotKeyboardFocus
GotKeyboardFocus
LayoutUpdated
Loaded
ContentRendered

Closing a WPF Window, the events that fire are:

Closing
IsVisibleChanged
Deactivated
Closed

Adding a Button

Now let’s add our first control to the WPF window in our application.  We’ll add a button to the window by just dragging it onto the design surface in the XAML designer.

The designer ends up looking something like this:

And the XAML snippet in the bottom window is also updated as soon as we add the button:

Note that everything we do in the designer  is immediately reflected in the XAML.  This is because there is an exact match between what the designer renders and what is stored in the XAML.  You can think of the designer (or design surface) as nothing more than a combination XAML viewer and XAML editor.

We can also demonstrate here that working in the opposite direction works as expected—if you edit the XAML, the designer updates immediately to reflect your changes.  Note that we don’t even have to save the file—the content in the designer changes immediately, as we type!  You can also edit property values in the Properties window that is docked to the right of the designer (under the Solution Explorer).

Let’s take a look now at what happens in our generated code, once we have a couple of controls on the design surface.  I’ll add a CheckBox to the window and then open up Window1.g.cs.  Note that this source file is not updated until we build (since it’s generated from the XAML whenever we build).  If we rebuild the project now and take a look, we’ll see that both controls have been declared at the top of our partial class and that the Connect method includes them in its switch statement:

This code is creating/initializing the controls at runtime, based on the content in the BAML memory stream that was included in our assembly.

Event Handlers

Now it’s time to wire up our first event handler so that we can do something when the button is clicked.

At first glance, something important is missing from Visual Studio.  When we have the WPF Designer open for our main window and have selected our button, the Properties window doesn’t seem to list any events.  Entirely missing is the little event icon that lets us get a list of all events for the currently selected control.

The question then becomes—what designer support do we have for adding event handlers in a WPF application?  The answer is to edit the XAML directly.  If we position the cursor at the end of the attribute list for the Button element in our XAML editor and press space, we see a nice intellisense popup listing all available attributes (properties and events).  Note the presence of the Click event in the image below:

If we select the Click event, or start typing “Click”, the editor adds a new attribute for the Click event and the intellisense window changes to indicate <New Event Handler>.  At this point, we can dbl-click on <New Event Handler>  to generate our event handler, or—better yet—just press the TAB key to generate the handler.

Once we’ve created the default event handler, our XAML looks like this (note the default handler name):

Now we can open our partial class implementation of Window1 in Window1.xaml.cs and we see our empty handler that has been generated for us:

Hello World

We’re finally ready to add some “hello world” code to our handler, which will execute when the Push Me button is clicked:

And—highly satisfying—we can run our program and get one of two message boxes to display, depending on whether the “verbose” checkbox is checked:

Next time, I’ll start looking in more depth at the various controls available in a WPF application, starting with the Button.

Hello WPF World, part 2 – Why XAML?

Let’s continue poking around with a first WPF “hello world” application.  We’ll continue comparing our bare bones wizard-generated WPF project with an equivalent Win Forms application.  And we’ll look at how XAML fits into our application architecture.

Last time, we compared the Win Forms Program class with its parallel in WPF–an App class, which inherits from System.Windows.Application.  The application framework in Win Forms was pretty lightweight–we just had a simple class that instantiated a form and called the Application.Run method.  WPF was just a bit more complicated.  If we count the generated code, we have an App class split across a couple of files, as well as a .xaml file that defines applicaton-level properties (like the startup window).

Now let’s compare the main form in our Win Forms application with the main window generated for us in WPF.  (The fact that WPF calls it a window, rather than a form, hints at the idea that GUI windows aren’t meant to be used just for entering data in business applications).

In Windows Forms, we have two files for each form–the form containing designer-generated code (e.g. Form1.Designer.cs) and the main code file where a user adds their own code (e.g. Form1.cs).  These two source files completely define the form and are all that’s required to build and run your application.  In Windows Forms, the designer renders a form in the IDE simply by reading the Form1.Designer.cs file and reconstructing the layout of the form directly from the code.  (The IDE does create a Form1.resx resource file, but by default your form is not localizable and the resource file contains nothing).

When you think about it, this approach is a bit kludgy.  The designer is inferring the form’s layout and control properties by parsing the code and reconstructing the form.  Form1.Designer.cs is meant to contain only designer-generated code, so with partial classes, we can keep designer-generated code in a single file and it only contains designer code.  But it’s clumsy to use procedural code to define the static layout of a form.

Here’s a picture of how things work in Win Forms:

In this model, the Form1.Designer.cs file contains all the procedural code that is required to render the GUI at runtime–instantiation of controls and setting their properties.  We could dispense with the designer in Visual Studio—it’s just a convenient tool for generating the code.  (I’m ashamed to admit that I’ve worked on projects that broke the designer and everyone worked from that point on only in the code–ugh)!

Now let’s look at WPF.  Here’s a picture of what’s going on:

Note the main difference here is–our designer works with XAML, rather than working with the code.  This is the big benefit of using XAML–that the tools can work from a declarative specification of the GUI, rather than having to parse generated code.  This also means that it’s easier to allow other tools to work with the same file–e.g. Expression Blend, or XamlPad.

Then at build time, instead of just compiling our source code, the build system first generates source code from the XAML file and then compiles the source code.

But this isn’t quite the whole story.  It’s not the case in WPF that the Window1.g.cs file contains everything required to render the GUI at runtime.  If we look at the Window1.g.cs file, we don’t find the familiar lines where we are setting control properties.  Instead, we see a call to Application.LoadComponent, where we pass in a path to the .xaml file.  We also find a very interesting method called Windows.Markup.IComponentConnector.Connect(), which appears to be getting objects passed into it and then wiring them up to private member variables declared for each control.  If we add a single button to our main window, the code looks something like:

But then the obvious question is–what happened to all those control properties?  Where do the property values come from at runtime?

Enter BAML–a binary version of the original XAML that is included with our assembly.  Let’s modify the above picture to more accurately reflect what is going on:

Note the addition–when we build our project, the contents of the XAML file–i.e. a complete definition of the entire GUI–is compiled into a BAML file and stored in our assembly.  Then, at runtime, our code in Window1.g.cs simply loads up the various GUI elements (the logical tree) from the embedded BAML file.  This is done by the Connect method that we saw earlier, in conjunction with a call to Application.LoadComponent:

MSDN documentation tells us, for LoadComponent, that it “loads a XAML file that is located at the specified uniform resource identifier (URI) and converts it to an instance of the object that is specified by the root element of the XAML file”.  When we look at the root element of the XAML file for our application, we discover that it is an object of type Window, with the specific class being HelloWPFWorld.Window1.  Voila!  So we now see that the code in Window1.g.cs which was generated at build time just contains an InitializeComponent method whose purpose it is to reconstitute a Window and all its constitutent controls from the GUI definition in the XAML file.  (Which went along for the ride with the assembly as compiled BAML).

So what is BAML and where is it?  BAML (Binary Application Markup Language) is nothing more than a compiled version of the corresponding XAML.  It’s not procedural code of any sort–it’s just a more compact version of XAML.  The purpose is just to improve runtime performance–the XAML is parsed/compiled at build time into BAML, so that it does not have to be parsed at runtime when loading up the logical tree.

Where does this chunk of BAML live?  If you take a look at our final .exe file in ILDASM, you’ll see it in the manifest as HelloWPFWorld.g.resources.  Going a tiny bit deeper, the Reflector tool shows us that HelloWPFWorld.g.resources contains something called window1.baml, which is of type System.IO.MemoryStream.  (I found something that indicated there was also a BAML decompiler available from the author of Reflector, which would allow you to extract the .baml from an assembly and decompile back to .xaml–but I couldn’t find the tool when I went looking for it).

So there you have it.  We haven’t quite yet finished our “hello world” application, but we’re close.  We’ve now looked in more depth at the structure of the application and learned a bit about where XAML fits into the picture.  Next time, we’ll add a few controls to the form and talk about how things are rendered.

Hello WPF World, part 1

All right, it’s time to create our first “hello world” application in WPF.  Let’s just use the Visual Studio wizard to create an application and then poke around to see what we got.  (Yes, I know I’m a bit late to the WPF game, but let’s just get started).

We’ll start by doing a New Project in Visual Studio 2008.  Under Visual C# (I’m a C# guy), select Windows to see projects related to thick clients.  If you change the targeted .NET Framework to version 3.0 or 3.5, you’ll see the following WPF project types:

  • WPF Application
  • WPF Browser Application
  • WPF Custom Control Library
  • WPF User Control Library

This seems pretty straightforward.  We’re building an application, rather than a control library.  So we want to create a WPF Application. I’ll explore creating WPF controls later.

Now it’s time to see what the project wizard created for us in our project.  As we walk through the solution, let’s compare the pieces with an equivalent “hello world” application in Win Forms, just to see how WPF differs.

AssemblyInfo.cs

For starters, both projects have an AssemblyInfo.cs file that describes metadata for the assembly.  Cracking them open,  they’re pretty similar, as expected.  But there are a couple of differences.

The WPF project includes a couple additional namespaces—System.Resources and System.WindowsSystem.Resources is added for the NeutralResourcesLanguage attribute.

System.Windows is, surprisingly, a new namespace for WPF, containing a lot the high-level WPF classes and types.  In this case, we’re using the ThemeInfo attribute and the ResourceDictionaryLocation enumeration.

The first new chunk of stuff in the WPF file is a commented out instance of the NeutralResourcesLanguage attribute and a comment about adding an <UICulture> tag to your project, if you want your application localizable.  Adding the <UICulture> tag  to your project file will tell the project that it should be localizable, and causes creation of the external satellite DLL.  We’re also instructed to uncomment the NeutralResourcesLanguage attribute, and setting the culture to match the <UICulture> tag—which indicates what our “neutral” language is, i.e. the native language of the assembly itself.  This reportedly speeds performance during the resource fallback process—runtime won’t  bother looking for an external resource DLL if the thread’s CurrentUICulture matches the neutral culture of your assembly.  A little unclear why the attribute is required—possibly just to make sure you set the neutral culture to match the <UICulture> tag.

Next, the WPF AssemblyInfo.cs file contains an instance of the ThemeInfo attribute.  This attribute has to do with defining theme-specific resources for your controls—i.e. you define a set of resources that applies a style to your controls, depending on which Windows theme is active.  Looks like a topic for a future post.

Resources.resx & Resources.Designer.cs

The default resources file created by the project wizard is the same for a WPF application as for a Win Forms application.  We get an empty resource file and an internal class that will be used to contain strong-typed string resources.  (The strongly typed resources were new in VS2005 and offer the huge benefit of being told at compile time that you misspelled a resource name, rather than just having the resource not be found at run time).

Settings.settings & Settings.Designer.cs

The default settings file in WPF is the same as the Win Forms file, with one subtle difference.  The WPF version uses an XML namespace of “uri:settings”, rather than the Win Forms explicit namespace, which is “http://schemas.microsoft.com/VisualStudio/2004/01/settings”.  I’m not enough of an XML or a URI/URN guru to understand the difference here, other than observing that the WPF version is more generic.  It’s also interesting to see that using “uri” for the URI scheme (the part before the colon) is not an official IANA-registered usage.  (See http://en.wikipedia.org/wiki/URI_scheme).

Assembly References

The WPF project references three new assemblies for WPF : PresentationCore, PresentationFramework, and WindowsBase.  These just contain new WPF types, sprinkled across many different namespaces.  (By the way, if you’re curious about the total # types in the Framework, take a look at this post by Brad Abrams: http://blogs.msdn.com/brada/archive/2008/03/17/number-of-types-in-the-net-framework.aspx).

Out of curiosity, I ran NDepend on these WPF assemblies and came up with the following metrics.  PresentationCore – 2,711 types,  PresentationFramework – 2,306, and WindowsBase – 785.  And these are just a subset of the assemblies introduced for WPF in .NET 3.0!

The WPF project does not reference the System.Deployment, System.Drawing or System.Windows.Forms assemblies.  System.Drawing and System.Windows.Forms include GDI+ and Windows Forms functionality, respectively, so it’s obvious why we no longer need them in WPF.  System.Deployment is related to deploying with ClickOnce and it’s not clear why the Win Forms project included it by default.

App.xaml vs. Program.cs

Now we come to the core differences between a Win Forms and a WPF application.  In terms of what you see in the WPF project, the App class couldn’t be simpler—an empty partial class deriving from System.Windows.Application and a mostly empty XAML file:

App.xaml.cs

App.xaml.cs

App.xaml

App.xaml

Wait a minute!  Where’s my Main() function?  In the wizard-generated Win Forms project, we got a Program.cs file with a Main(),  which called System.Windows.Forms.Application.Run, passing it an instance of our main form.  But how does the WPF application start itself up?

The hint is that our App class is declared as a partial class.  If we right-click on the App class and select Go To Definition, we can hunt down the file App.g.i.cs (in the \Debug or \Release folder, if we’ve built our application).  You can also click Show All Files in the Solution Explorer and expand the obj\Debug folder, finding App.g.cs.  (These files appear to be identical—perhaps the i.cs file is generated by Intellisense)?

The magic that creates these generated files at build time comes from the <Generator>MSBuild:Compile</Generator> line in our .csproj file, for the App.xaml file (under ApplicationDefinition tag).  When App.xaml is built, MSBuild generates the actual code that represents what was declared in App.xaml, storing the code in App.g.cs.  The actual code generation magic happens in the Microsoft.Build.Tasks.Windows namespace, which lives in the PresentationBuildTasks assembly.  Sounds like another topic for a future blog.  (I started to get lost in Ildasm).

Now let’s take a look at the App.g.cs file.  It shows that we’re deriving from System.Windows.Application, which is the main WPF application class.  We also see that the InitializeComponent method is pulling stuff in from the XAML file.  In our case, all we have in App.xaml is a value for the StartupUri attribute, which pointed to the XAML file for our main window.  In our code, this maps to setting the StartupUri property of the Application class.  This is basically just—the UI that should be shown when our application starts.

App.g.cs

App.g.cs

The Main function is very similar to what we find in Program.cs for our Win Forms application—we just create an instance of our App class, call InitializeComponent to set stuff up, and call the Application.Run method.  It should be no surprise that the documentation for Run tells us that it creates a System.Windows.Threading.Dispatcher object, which creates a message pump to process windows messages.

Note that we could also call Run and pass it a Window object to indicate the first window to open when the application starts.  Instead, the generated code specifies the first window by setting the StartupUri property.

Next time: Looking at the Window1.xaml, Window1.xaml.cs and Window1.g.cs files, which define the application’s main window.

It’s a WPF World, part 2

Let me continue my ramble about Microsoft technologies leading up to WPF.  Last time, I ended by talking about the .NET technologies and why I think they are so important.  .NET has become the de facto standard for developing applications for the Windows platform (thick clients).  And although ASP.NET likely doesn’t have nearly as big a chunk of market share as Windows Forms, it feels like the WISA stack (Windows, IIS, SQL Server, ASP.NET) is gradually overtaking the LAMP stack (Linux, Apache, MySQL, PHP).  And with the rise of RIAs (Rich Internet Applications), ASP.NET Ajax will likely encourage the continued adoption of the ASP.NET technologies.

Going back to my list of the most important benefits of the .NET world from last time, I realized that I’d like to add a final bullet item.  (In the list–what’s so special about .NET):

  • Programmer Productivity — with things like intellisense and code snippets in Visual Studio, you can be incredibly productive, whether working in Win Forms or ASP.NET

I make the claim about productivity without having had experience with other development environments (at least since doing OWL development with Borland tools).  But the rise in productivity is true even just of Microsoft tools.  They just continue to get better and better.  And though “real programmers” might pooh-pooh all this intellisense nonsense in favor of hand coding in Textpad, I have to believe that even these guys would be more productive if they truly leveraged the tools.

When .NET first came out, I remember reading the marketing materials and being a little misled about where ASP.NET fit into things.  It seemed like Microsoft was touting convergence of Windows vs. web development, by talking up the similarities of the dev experience, working in Windows Forms vs. Web Forms.  Developing with ASP.NET was ostensibly very similar to developing Win Forms applications–you started with an empty design surface, dragged visual controls onto it, and double-clicked to bring up an editor where you wrote your code-behind.  (Nevermind that this model encouraged low quality architectures as people wrote monolithic chunks of event handler code–perpetuating bad habits that we learned with VB6).

But the web model was still very, very different from the thick client model.  On Windows, we were still working with an event-driven model, using the same old Windows message loop that we’d always used.  But users interact with a web-based interface in a completely different way.  We used server-side controls in ASP.NET to hide some of the complexity, but we were still just delivering a big glob of HTML to the client and then waiting for a new HTTP request.

The ASP.NET development environment also felt a bit kludgy.  I remember being a bit dismayed when I wrote my first ASP.NET application.  In the classic Win Forms development environment, there were two separate views of your application, where a developer lived–the design surface and the code behind.  The ASP.NET environment has three–the design surface, the code behind, and the HTML content.  So now instead of a developer jumping back and forth between two views, you end up jumping around in all three.

Spoiler–this web application architecture gets a lot cleaner with Silverlight 2.0.  There seems to be actual convergence between thick vs. thin clients as we use WPF for thick clients, Silverlight 2.0 for thin.  But more on that later.

So along comes WPF (Windows Presentation Foundation) and XAML (Extensible Application Markup Language).

I remember when I first read about XAML and WPF (Avalon at the time).  My first reaction was to be mildly frustrated.  At first glance, XAML seemed to be an arbitrary switch to a new syntax for defining GUIs.  And it seemed cryptic and unnecessary.  In the effort to be able to define a user interface declaratively rather than procedurally, it looked like we were ending up with something far messier and garbled than it needed to be.  It felt much easier to understand an application by reading the procedural code than by trying to make sense of a cryptic pile of angle brackets.

But I’ve come to realize that the switch to defining GUIs declaratively makes a lot of sense.  With XAML, thick clients move a bit closer to web applications, architecturally–the GUI is built from a static declaration of the UI (the XAML), a rendering engine, and some code behind.  And the layout of a user interface (rather than the behavior) is implicitly static, so it makes sense to describe it declaratively.  [As opposed to Windows Installer technology, which converts the dynamics of the installation process to something declarative and ends up being far messier].

Why does it make sense to separate the markup from the code like this?

  • Architecturally cleaner, separating the what (XAML declaraction of GUI) from the how (code-behind).  (Separating the Model from the View)
  • Enables broad tool support–tools can now just read from and write to XAML, since the GUI is now defined separately from the application itself.  (Enabling separate tools for designers/devs, e.g. Expression Blend and Visual Studio).
  • Cleaner for web apps — because we can now serialize a description of the GUI and send it across the wire.  This just extends the ASP.NET paradigm, using a similar architecture, but describing a much richer set of elements.

Another of my earlier reactions to XAML was that it was just a different flavor of external resource (.resx) files.  It looked similar–using angle brackets to describe GUI elements.  But XAML goes far beyond .resx files.  Resource files are used to externalize properties of UI controls that are potentially localizable.  E.g. Control sizes, locations and textual elements.  But the structure is flat because a resource file is nothing more than a big collection of keyword/value pairs.  Nothing can be gleaned about the structure of the UI itself by looking at the .resx file.  XAML, on the other hand, fully describes the UI, hierarchically.  It is far more than a set of properties, but it is logically complete, in that it contains everything required to render the GUI.

XAML is a big part of what makes WPF so powerful.  But there are a number of other key features that differentiate WPF from Windows Forms.

  • Totally new rendering engine for the GUI, based on Direct3D.  This enables better performance in rendering of the GUI, because everything in your GUI is described as 3D objects.  So even apparent 2D user interfaces can take advantage of hardware acceleration on the graphics card.  [The new NVidia GT200 GPU has 1.4 billion transistors, compared with original Core 2 Duo chips, which were in the neighborhood of 300 million].
  • Vector graphics.  The GUI is now entirely defined in vector graphics, as opposed to bitmapped/raster.  This is huge, because it means that you can define the GUI geometry indepedent of the target machine’s screen resolution.  This should mean–no more hair-pulling over trying to test/optimize at various screen resolutions and DPI settings.  (Gack)!
  • Bringing other APIs into the .NET fold.  E.g. 3D, video, and audio are now accessible directly from the .NET Framework, instead of having to use APIs like DirectX.
  • Focus on 3D graphics.  All of the above technologies just make it easier to develop stunning 3D graphical user experiences.  Powerful/cheap graphics hardware has led to 3D paradigms like Apple’s “cover flow” showing up more and more often in the average user interface.  (Battleship Grey, you will not be missed))

So where does WPF fit into the rest of the .NET world?  Is WPF a complete replacement for Windows Forms?

Adopting WPF will not be nearly as big a learning curve as adopting .NET was, originally.  WPF is a full-fledged citizen of the .NET world, existing as a series of .NET namespaces.  So .NET continues to be the premiere Microsoft development technology.

WPF is definitely a replacement for Windows Forms.  It is the new presentation layer, meant to be used for creation of new Windows-based applications (thick clients).  Microsoft is probably hesitant to brand WPF purely as a Windows Forms replacement, not wanting to dismay development shops that have invested a lot in learning .NET and Windows Forms.  But it’s clearly the choice for new Windows-based UI development, especially as the number of WPF controls provided by the tools, and shipped by 3rd party vendors, increases.

WPF is also highly relevant to web development (thin clients).  Silverlight 2 allows a web server to deliver browser-based RIAs containing a subset of the widgets found in WPF.  (Silverlight 2 used to be called Windows Presentation Foundation/Everywhere).  With WPF and Silverlight, Windows and web development are definitely converging.

So we clearly now live in a WPF world.  WPF will rapidly become more widely adopted, as it is used for more and more line-of-business applications, as well as serving as the underlying engine for the new Silverlight 2 RIAs that are starting to appear.  And the best news is that we also still live in a .NET world.  We get all of the .NET goodness that we’ve learned to love, with WPF being the shiniest new tool in our .NET toolbox.

It’s a WPF World, part 1

Has everyone realized that it’s a WPF world out there?  What I mean is this.  Let’s say you’re a classic Windows programmer–meaning that you want to build a basic native Windows application.  You know–just an .exe file that lives on your hard drive, that you run, and that displays a window with some stuff in it.   (Let’s set aside for just a moment Bill’s “Internet Tidal Wave” and Ozzie’s “Device Mesh” and assume that you want to build a good old-fashioned Windows app).  Where are we at today?  Well, WPF is absolutely the world that we live in at the moment.

Let’s think about how we got here.  In the beginning, it was a WinAPI world.  For years, the mantra was, “Thou shalt read Petzold, cover to cover”.  If you don’t know what this means, you’re either too young or you just plain don’t care about what’s under the hood.  With NT and Windows 95, we got to graduate to Win32, but it was still a grand world, working with WinAPI.  (Test yourself–do you get a warm fuzzy feeling, or do you shudder, when you read the following)?

SendMessage(hList,LVM_SETITEM,0,(LPARAM)&LvItem); // Enter text to SubItems

Ahh, memories. Well, after the WinAPI world, we got to graduate to the world of MFC.  (Didn’t it stand for “Millions of Freakin’ Classes”)?  Remember message maps and CCmdTarget?  Actually, aside from unwanted Afx functions in later COM applications and the inevitable bloat, I mostly escaped working with MFC.  I was writing Motif applications for VAX/VMS at the time–but that’s a different story.

Then we come to the glorious days when it was a COM world.  Ahh–David Chappell, Don Box, and even–shudder–Brockschmidt.  I’m still paying off loans taken out to buy tech books during the COM era.  All you really need to know about COM is: a) it’s all about interfaces, baby; b) you need to chant the following in your sleep every night–QueryInterface, AddRef, Release; and c) you’ll learn to love the venerable BSTR.  When I’d worked with COM long enough to finally understand it, my main thought was–holy crap, this stuff is complicated enough that I now truly have job security.

It was, briefly, an ATL world.  ATL was a fluffy breath of fresh air for the beleagured COM programmer.  Or maybe it just felt like a well-earned reward for having truly learned COM.  Sort of like the boy scout who finally gets to use a gas stove after years of making fires by rubbing two sticks together.  Actually, I get a pretty warm fuzzy feeling, remembering ATL–and building out-of-process COM servers in VC6.  Not a bad world at all, really.  I almost miss it.

Still with me as I ramble?  Shall we jump to 2002, when it became a .NET world?

Ok, a brief rant.  A few years back, a fellow colleague (Software Engineer), who’d been a developer for quite a few years, confided to me that he liked programming, but what he absolutely hated is how things kept changing.  Every time a new technology came out, he became infuriated.  I was a little shocked–first of all, because the constant stream of new technologies is what I absolutely love about being a Windows developer.  But mainly, I thought–if you hate change so much, why the hell are you a Windows developer?

On to 2002, when it became a .NET world.  Regardless of when you jumped into .NET, or which Windows technology you came from, you just have to agree that .NET is our Seventh Heaven reward for all of those years of wrestling with these other technologies.  Or is it just Dante’s outermost circle of hell?  In any case, being a C# developer in the .NET world is truly a treat, after the path that we’ve taken to get here.  (Yes, yes, yes–VB.NET is fine language, you do have XML literals while we do not, and you are a person that people like and respect).

If you can’t tell, I’m a C# developer.  Of course, as has been said many times before, the choice of language in .NET is really irrelevant–it’s all about the framework.  The learning curve is obviously in learning thousands of framework classes, rather than arguing about this vs. Me.  I’m definitely not a VB hater–I’ve written a lot of VB6 code over the years.  But I just love working with C#.  It’s C++ with all the dangerous pointy stuff that can hurt you removed.  So no need for political correctness here–I’m going to post examples in C# and get on with it.

What’s so special about .NET?  Some of the standouts for me, in no particular order, are:

  • Language Independence — you can write in your language of choice, since all CLS-compliant languages just resolve to IL and your code can run in the the CLR.
  • Memory Management — (and garbage collection).  No more having to remember to delete every element of an array, as well as the array itself.  Just create your objects and let the CLR worry about having to delete them.
  • CLR as a VM — because your code runs in a virtual machine, we can hypothetically run anywhere and are no longer tied to Windows.  (E.g. Mono).  This is less critical for thick clients but will become more important as we move to Silverlight 2).
  • Reflection — very cool, for debugging, discovery, or just the elegance of having an assembly be self-describing.  Much nicer than the old COM external .tlb file scheme.
  • The .NET Framework — without a doubt, the greatest benefit of .NET.  Wow–thousands of classes that someone else has written that just work.  I’m constantly stumbling on things that I thought I’d have to write, but discover are already present in the framework.

That’s a very crude list of some of the highlights of .NET and why I think it’s so powerful.  There’s no need for me to write yet another high-level overview of what .NET is, or what the parts are.  The book Understanding .NET, by David Chappell is still an excellent introduction/overview.

Well, I’ve run out of room and run out of time.  I’ll save the rest of this particular ramble for later, when I talk just a bit about Win Forms, ASP.NET, and WPF..

[Ok, an editorial comment–this started out being a simple set of notes for creating a first “Hello World” WPF application.  Instead, it sort of turned into a campy litany of old Microsoft technologies.  So I’ll save the Hello World post for next time].

Confessions of a Podcastaholic

I’ve been an iPod user for about a year and a half now.  I’m an obsessive music lover and collector, but I waited quite a while before I bought my first MP3 player.  My rationale was that I didn’t just want something that would let me carry around an album or two.  If that was the case, I’d be constantly moving music onto the player and off again.  Instead, I wanted to wait until I could buy something that could store my entire music collection–or at least enough of it that I’d be able to carry around a good percentage of my collection with me.

I’d been digitizing my CDs for years and enjoying listening to them on my PC, working my way through various player software.  Pre-iPod, I’d eventually settled on the RealPlayer application for managing all my music.  But it never crossed the line to become a truly great application for me.  I liked the idea of being able to organize everything into multiple playlists and then play through a playlist on shuffle mode.  But the biggest pain point was still that my music was stuck in one physical location–on one physical PC.

Like a lot of software developers, I like to occasionally wear headphones while at work.  Working in cubeland, this is often necessary, given the noise and distractions.  I hauled an old laptop into work at one point, after copying much of my music collection to it.  So I now had my music in two different places–on my home PC and at work.  I could also now make the statement that I had an MP3 player of sorts, albeit a 6 pound one that took a few minutes to boot up.

At some point it dawned on me that I should just ditch my old laptop and upgrade to one of the latest and greatest iPods.  At the time, the 80GB video model was the largest one available.  I plunked down my money and after a short wait got my first ever Apple product.

It was incredible.  As expected, it just worked.  It took some time, but I gradually started moving my music collection onto the iPod.  I had plenty of room with 80GB, and I was pleased that I’d finally found what I wanted–a single device where I could store my entire music collection.  It also truly amazed me when I realized one day that my “little music player” had a hard drive twice as large as my Windows development laptop at work.  Ok, granted, my company tends to cheap out on PCs.  But still–here I am a well-paid software developer and I have 2x the space on a deck-of-cards device as I do on my development machine.  Wow.

This is the point where my life really began to change.  Having my entire CD collection, going back 25 years, in my pocket was truly astounding.  But I quickly discovered the true killer app of the iPod–podcasts.  Before I bought the iPod, I had some vague notion that there were podcasts out there and I understood the basic concept.  But I’d not planned on listening to podcasts at all–I’d bought the iPod solely as a music device.

The podcast habit started when, out of curiosity, I began to listen to some of the more popular tech/software podcasts–This Week in Tech and .NET Rocks.  I quickly added daily news, more technical stuff, and a bunch of family history related podcasts.  I just couldn’t get enough–I became a complete podcastaholic.  Just one month into my iPod experience, I was listening to podcasts during my commute, while at work, and late into the evening.  I was hooked.  At some point, I realized that it had become rare for me to listen to music anymore.  I was using the iPod exclusively to listen to podcasts.

Podcasts became a huge hit for me for two reasons.  For starters, it was just so darn easy to get the music onto the device.  I left iTunes running constantly on my PC at home and plugged the iPod in every night, which meant that I’d automatically get all the latest episodes of everything the next morning.  Better yet, Mr. Jobs was clever enough to remove the podcasts that I’d already listened to.  Nothing could be easier.

The second biggie for me was just the excellent content that was available.  It was reminiscent of hunting for good programming on public radio, except that I had about a thousand times the number of programs to choose from.  So instead of getting Science Friday (fairly interesting, mildly relevant), I was now listening to .NET Rocks with Carl and Richard twice a week (very energizing and hugely relevant).  I was in absolute techie heaven!

The great thing is how dynamic the podcast universe is.  Podcasts are born and die all the time, with new content showing up almost daily.  I try to go back to iTunes every few weeks and just do some browsing.  And it seems like I always stumble on something new, interesting, and worth listening to.

Eighteen months into my podcast experience, I haven’t slowed down and I’m as much a podcastaholic as ever–even more so.  With plenty of house projects to work on and a huge lawn to mow, Carl and Richard now accompany me on the riding mower–along with Leo, Paul Thurrott, Robert Heron and even those wacky Digg guys from time to time.

Here’s my current podcast lineup.  These are the podcasts that I listen to fairly regularly and I can highly recommend everything on these lists.

Audio Podcasts

– A Prairie Home Companion’s News from Lake Wobegon – weekly, 15 mins – I’ve been listening to PHC since the early 80s and now I no longer miss the core Keillor experience (NFLW).
– Garrison Keillor’s The Writer’s Almanac – daily, 5 mins – Nice little bit of daily history (whose birthday is it today), along with a poem
– The ASP.NET Podcast by Wally McClure and Paul Glavich – every few days, variable – Wally is easy to listen to and you’ll get plenty of ASP.NET goodness
– Dear Myrtle’s Family History Hour – weekly, 1 hr – a bit too quaint for my tastes, but often some nice family history gems
– Entrepreneurial Thought Leaders – weekly (seasonal), 1 hr  – Excellent lecture series out of Stanford, wonderful speakers
– Front Page – daily, 5 mins – NY Times front page overview, good quick news hit
– Genealogy Gems – biweekly(?), 45 mins – Lisa Cooke’s excellent genealogy podcasts
– The Genealogy Guys Podcast – weekly, 1 hr – very solid genealogy stuff, weekly news & more
– Hanselminutes – weekly, 40 mins – One of my favorites, Scott Hanselman helps you grok the coolest new technologies
– History According to Bob – daily, 10-15 mins – Bob is a history professor and relentless podcaster.  Excellent stuff.
– .NET Rocks – 2/wk, 1 hr – Absolute must-listen for anyone doing .NET.  Great, great material.
– net@night – weekly, 1 hr – Leo Laporte and Amber MacArthur, with weekly web gossip.
– News.com daily podcast from CNET – daily, 10 mins – Good daily tech news overview
– NPR 7PM ET News Summary – daily, 5 mins – Another little daily news blurb.
– Polymorphic Podcast – sporadic, 45 mins – Craig Shoemaker, sometimes good stuff on patterns, bit spotty lately
– Roz Rows the Pacific – every 2 days, 25 mins – Roz Savage is podcasting 3 times/wk as she rows across the Pacific.
– Security Now – weekly, 1+ hrs – Steve Gibson on all things security.  Deeply technical and not to be missed.
– stackoverflow – Weekly, 1 hr – New podcast, with Joel Spolsky and Jeff Atwood.  Both very insightful on software dev topics
– This week in Tech – weekly, 1.5 hrs – Leo Laporte’s flagship podcast.  Can be more fluff than content, but a fun listen
– Windows Weekly – weekly, 1+ hrs – One of the highest quality podcasts available, Paul Thurrott w/excellent stuff on Windows

Video Podcasts

– Democracy Now! – daily, 1 hr – I don’t always have time for it, but Amy Goodman is true journalism, pure gold.
– Diggnation – weekly, 1 hr – absolute fluff, but sometimes fun to watch Kevin and Alex gossip
– dl.tv – weekly, 1/2 hr – Tied for 1st place w/Tekzilla as best techie show, great content
– Gametrailers.com – XBox 360 spotlight – daily (multiple), 2-3 mins – some great game trailers
– Geekbrief.TV – daily, 3-4 mins – Cali Lewis, quick recap of latest cool gadgets
– Mahalo Daily – daily, 5 mins – more entertainment than tech content, but sometimes some interesting stuff
– Tekzilla – daily, 1-2 mins (weekly, 40 mins) – Excellent techie show, with Patrick Norton & Veronica Belmont
– X-Plays daily video podcast – daily, 2-3 mins – Video game reviews

Looking back, I realize that I did go through an evolution in how I listen to music when I bought the iPod.  Although I started out thinking that I just wanted a convenient way to listen to my CDs, I was of course moving from CDs to a world where all my music is digital, and stored as MP3s.  This is truly an evolutionary step, in the same way that moving from vinyl to CDs was, back in the 1980s.  I do still buy lots of CDs, but only because I object so strongly to DRM.  The moment I pull a new CD out of its shrink wrap, it gets ripped, stored and sprinkled into various playlists.  I now have dozens of CDs that I’ve purchased, but never actually listened to on a CD player.

But as life-changing as it’s been to evolve my music listening habits, the amazing thing is that CDs to MP3s was a subtle life shift, compared to how podcasts have changed things for me.  I have access to so much wonderful content and in such a convenient form factor.  And my kludgy setup–iTunes on the PC and nightly synchs–will likely soon be replaced by something much more convenient and seamless.

The great thing is that the podcast revolution is just getting started.  Or maybe we should call it the user-generated content revolution.  Media is beginning to change in ways that most people just can’t imagine.  We are just beginning to be able to watch and listen to exactly what we want, when we want and where we want.  Technology is bringing our media to us.  Not only do we no longer have to physically plop down in front of a television, the content that we can choose from goes far beyond the selection that we’ve gotten from satellite TV.  Even more amazing, the boundaries between media producer and media consumer are dissolving.  It’s nearly as easy for me to produce my own podcast as it is to subscribe to one.  That’s just incredible.  And it’s far, far easier for people who generate high-value content, like Leo Laporte, to get their content delivered to me.

It’s a wonderful world–and I plan on continuing to wear my podcastaholic badge proudly.